Configure the HCM PlanSource Integrations
How to configure connection settings, process properties, cross-reference tables, and data maps for this integration.
The integration processes in the PlanSource integration do the following:
- Export person data — such as new hires, terminations, employee demographic updates — to PlanSource.
- Import benefits data — such as scheduled payroll deductions — from PlanSource.
This topic describes how to configure this integration.
Before you start
- From the PlanSource consultant or project manager, get the user account and paycodes, and make sure that the Benefit End Date is the same date as the End Date.
- Make sure that your Function Access Profile (FAP) gives access to integrations; see Configure Access to Integrations.
- Deploy the following Dimensions HCM PlanSource integration packs; see Deploy Integration Packs to your Atom:
Select the environment
-
Open the Integration Template Designer: Navigate to .Note: If prompted, enter your Username and Password. Click Log in.
- Select the .
- Select your environment.
Configure the PlanSource Demographic Export
HCM PlanSource Demographic Export integration
Select environment extensions
- In Administration, click tap
- In
Process Filter, the magnifying glass

. It can take several seconds before the button becomes active. - Scroll to and select the integration pack: .
Configure connection settings
- Select Connection Settings.
-
From the
Connection dropdown list, select and configure:
Setting
Required
Actions
APIGatewayServer
Required
(Optional) To change the default API gateway server:
- Clear Use Default.
- Enter the
URL to the server.
Example:
{
 CustomerTenantURL}/api
HCMAuthenticationServer
Required
(Optional) To change the HCM authentication server:
- Clear Use Default.
- Enter the URL to the server.
Example:
https://prd01-mws01.prd.mykronos.comPSAuthenticationServer
Required
The PlanSource authentication server controls the connection to the PlanSource environment.
(Optional) To change the server:
- Clear Use Default.
- Enter the
URL to the server.
Example:
https://api.plansource.com
Configure process properties
Process properties apply globally to all records that an integration processes. When you install the integration, you can define the parameter values or configure a prompt for the user to define the value when they run the integration.
- Select Process Properties.
-
Caution: Do not edit the default values of the AuthenticationProperties. By default, cookies are enabled and set the values for authentication properties.
Only while you test or design integration templates, should you edit the properties to connect to the authentication server and get the access token to execute APIs.
- From the Process Property dropdown list, select AuthenticationProperties.
- In GatewayDefaultPort, clear Use Default. Enter the path to the port for the API gateway.
-
Note: You no longer need an AppKey to call API operations. If one is defined, it is ignored.
-
From the
Process Property dropdown list, select
_External_HCMAuthenticationProperties to edit the properties to connect to the authentication server and get the access token to execute APIs.Caution: You must edit the HCMAuthenticationProperties for the account that accesses the APIs and all employee groups. This information is part of the tenant details.
Edit the following:
- userName: Clear Use Default. Enter the username.
- targetCompany: Default = Not Mapped. Clear Use Default. Enter the short name of the company exactly as it is defined in Dimensions HCM.
- password: Clear Use Default. Enter the password.
- api-key: The API key calls the HCM REST APIs from the HTTP request header. Clear Use Default. Enter the key for the destination.
- targetCompanyID: Default = Not Mapped. Clear Use Default. Enter the Company ID exactly as it is defined in Dimensions HCM.
-
From the
Process Property dropdown list, select
_External_PSAuthenticationProperties to edit the properties to connect to the authentication server and get the access token to execute APIs.Caution: You must edit the PSAuthenticationProperties for the account that accesses the APIs and all employee groups. This information is part of the tenant details.
Edit the following:
- clientID: Clear Use Default. Enter the identifier for the company exactly as provided by the PlanSource implementation team.
- secret: Clear Use Default. Enter a secret word that the person must enter in order to run the integration.
-
audience: Clear
Use Default. Enter the same URL as the
PSAuthenticationServer:
https://api.plansource.com - user: Clear Use Default. Enter the username of the person who has API access.
- lookupCode: Clear Use Default. Enter the same identifier as the clientID.
-
(Optional) HCMAPIErrorHandler properties define how the integration responds if an integration run exceeds an API limit.
Caution: In most circumstances, do not edit the HCMAPIErrorHandler properties; leave these settings at their default values.From the Process Property dropdown list, select _HCMAPIErrorHandler to change how to handle errors if integration runs exceed the limitations of an API.
-
MaxRetry: This property defines the maximum number of times to retry integration runs if errors occur.
Default = 5.
To change the number of retries:
Clear Use Default.
Enter the number of retries up to a maximum of 5.
-
TimeToWait: If an API limit is exceeded, this property defines how long to wait before sending the next API call.
Default = 60000 ms. If the API call has to be sent again, each repetition adds 60,000 ms (1 minute) to the wait time.
Examples:
1st TimetoWait = 60,000 ms (InitialTimeToWait)
2nd TimetoWait = 60,000 ms + 60,000 ms = 120,000 ms
3rd TimetoWait = 60,000 ms + (2 * 60,000 ms) = 180,000 ms
To change the initial wait time:
Clear Use Default.
Enter the wait time in milliseconds (ms) up to a maximum of 180000 ms.
Note: For hourly integrations, the maximum wait time between runs is 60,000 milliseconds (ms) (1 hour). -
MaxRetry: This property defines the maximum number of times to retry integration runs if errors occur.
-
From the
Process Property dropdown list, select
_CRTConfig to define headers in cross-reference tables.Caution: The Boomi™ application does not return default values for cross-reference table headers. You have to enter the headings in Value.
Cross-reference tables (CRT) are the look-up tables that the integrations use to translate parameter values. One or more data values from the source system can be used to assign one or more parameters in the destination system.
Note: For details, see Configure cross-reference tables. -
From the
Process Property dropdown list, select
_ProcessProperties to set process properties that must be configured before the integration can run.Caution: If you select Use Default for the connection settings and process properties, ensure that Value is blank. If Value is not blank, that value overrides the default value whether or not Use Default is selected or cleared. Example: If the default value is abc, but Value shows xyz, the integration uses xyz regardless of the setting of Use Default.
Property
Required
Actions
IncludeEmployees
Not required
Default = Include all employees.
To process data for only a limited group of employees:
- Clear Use Default.
- Enter the person numbers, as defined in the source system, each separated by a comma (
,) but no spaces.Example:
13997,15556,20012
QualifyHCMDelta
Not required
Default = false, import all records.
To import only changed records, including for new hires:
- Clear Use Default.
- Select Value.
QualifyDeltaLookBackDays
Not required
The number of days to search from today and earlier to get changed records.
Default = 1 day
- QualifyHCMDelta must be set to true.
- Clear Use Default.
- In Value, enter from 1—31 days.
Note: (Recommended) If you selected By Minute, lookback applies the last successful run as the lookback date. -
From the
Process Property dropdown list, select
_CostCenterDetails to set up to 3 levels in the business structure for PlanSource to define eligibility for benefits. The Cost Center Index values must identify the HCM cost-center hierarchy tree.Caution: You must map at least 2 levels of an HCM cost-center hierarchy to Division and Location in PlanSource.
Example: In this cost center tree, the Division is pulled from level 2 of the business structure and the Location is pulled from the labor category of Location Level 1:
- Division Cost Center Index = 1
- Division Level = 2
- Location Cost Center Index = 2
- Location Level = 1
- Union Code Cost Center Index = NotMapped
- Union Code Level = NotMapped
Property
Required
Actions
Division Cost Center Index
Required
Default = 1.
To set the cost center index for the Division Level:
- Clear Use Default.
- Select one of cost center 1— 9.
Division Level
Required
Default = 1.
To set the level in the business structure:
- Clear Use Default.
- Select one of level 1— 9.
Location Cost Center Index
Required
Default = 1.
To set the cost center index for the Location Level:
- Clear Use Default.
- Select one of cost center 1— 9.
Location Level
Required
Default = 1.
To set the level in the business structure:
- Clear Use Default.
- Select one of level 1— 9.
Union Code Cost Center Index
Not required
Default = Location Cost Center Index.
To set the cost center index for the Union Code Level:
- Clear Use Default.
- Select one of cost center 1— 9.
Union Code Level
Not required
This setting overrides the mappings in the UnionCode cross-reference table; see Configure cross-reference tables.
Note: You can use this property to map employees to union codes or to levels in the business structure that are lower than division.Default = Not Mapped, use the mappings in the cross-reference table. The Union Code Cost Center Index defaults to the configured Division Cost Center Index.
To set the union code level and override the UnionCode cross-reference table:
- Clear Use Default
- Select one of level 1— 9.
Configure cross-reference tables
Cross-reference tables (CRT) are the look-up tables that the integrations use to translate parameter values. One or more data values from the source system can be used to assign one or more parameters in the destination system.
A cross-reference table (CRT) translates parameter values in an integration as follows:
- Organizes data values into rows and columns:
- Maximums = 20 columns, 10,000 rows.
- Can combine values from multiple columns to determine a single output value.
- If more than one row matches a reference value, the first match is the output value.
- If no match is found, the output value can be null, or the integration can produce errors.
-
Caution: For the cross-reference tables that you are customizing, make sure that Use Default is not selected in , and that the headers are defined.
- Select Cross Reference.
-
From the
Cross Reference dropdown list, select any of the tables.
You cannot change the names of the tables.
_EmployeeStatus
Defines the employee statuses to not export from HCM to PlanSource.
Default = Export all employee statuses.
Column headers:
HCM Employee Status,DisqualifiedNote: You can enter asterisks (*) as wildcards inHCM Employee Statusto prevent export of all statuses._EmployeeType
Maps the employee type from HCM to the employment level in PlanSource.
Column headers:
HCM Employee Type,PS Employment Level_Gender
Identifies the gender of employees.
Note:In PlanSource, the values can be only:
- M: male
- F: female
- X: undisclosed
-
U: unspecifiedCaution: If you do not map the default HCM value of asterisk (*) to one of the PlanSource values, the integration assigns a default value of unspecified (U) in PlanSource.
Column headers:
HCM Gender,PS Gender_MaritalStatus
Identifies the marital status of employees.
In PlanSource, the values can be only
M(married),S(single), orU(unreported).Column headers:
HCM MaritalStatus,PS MaritalStatus_PayPeriodProfile
Maps the pay period profile in HCM to the organizational payroll ID in PlanSource.
Column headers:
HCM Pay Period Profile,PS Org Payroll IdGet the payroll IDs from PlanSource.
_PayType
Maps the pay type in HCM to the organizational payroll ID in PlanSource.
Caution: For initial setup, you must use this table to map the IDs.Column headers:
HCM Pay Type,PS Org Payroll Id_TerminationReason
Maps the reason between systems for an employee termination.
Column headers:
Kronos Termination Reason,PlanSource termination_reason_id_UnionCode
Maps the union in HCM to the union code in PlanSource.
Caution: If the Union Code Level is configured in the Demographic_CostCenterDetails process property, that Union Code Level overrides the mappings in this cross-reference table; see CostCenterDetails.Column headers:
HCM Union,PS Union Code -
Select Override to:
- Download the tables when you run the integration
- Edit the table cells in Extensions
- Repeat for other tables.
- Configure the data in the cross-reference tables; see the Edit Cross-Reference Tables for PlanSource topic.
Configure data maps
(Optional)
A data map translates a data structure from the source format to the destination format. Examples: Map "PersonID" in the source to "Person ID" in the destination or "LastName" to "Last Name".
Each integration pack has a default data map. Editing of the default map is limited to adding fields, changing mappings, or inserting functions. Any changes override the previous values. If the predefined fields do not suite your requirements, use the default map as a guide when you create your custom data map.
Requirements
- All fields require the Timekeeping license.
- Each of the templates must define record disqualification and exclusion criteria.
Customize data transformation
- Select Data Maps.
From the Data Maps dropdown list, select the HCMDemographicExport-v1_HR — HCMDemographicExport-v1_PlanSource map.
HCM Demographics Export to PlanSource data map
- Required fields are defined in the API and are indicated in the table.
- Effective dating is defined in the API. If effective dates are not provided, the dates default to today.
- Date fields use
YYYY-MM-DDformat.
- Select

to expand or
to collapse levels.To expand all levels, right-click the green boxes icon
. Select Expand All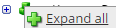
.The lines show the links between fields in the source (left side), any intermediate functions, and the destination (right side).
Map benefits start dates
(Optional) By default, the Benefits date maps to the hire_date for new employees or the rehire_date for returned employees.
To change the mapping to the Eligibility Period Start Date, do the following:
- On the Source side, navigate to
.
Note: To speed navigation, enter "
benefit" in Filter for each side. - On the Destination side, navigate to BenefitsStartDate.
- Connect
Benefits to
BenefitsStartDate.
- Click Tap OK.
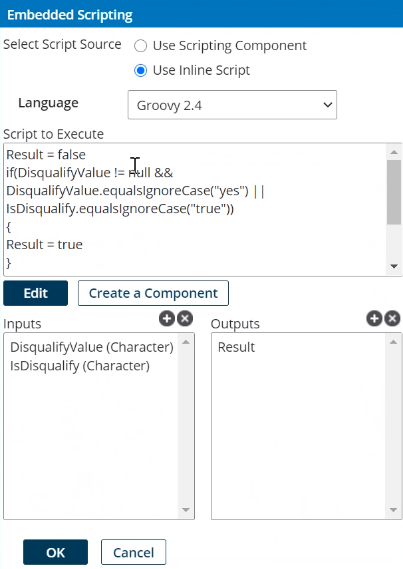
Disqualify employee records
(Optional) Typically, to not export an employee's records to PlanSource, you disqualify that employee in the _EmployeeStatus cross-reference table. However, to cover different types of disqualification — such as for Temporary or Terminated status — you need to configure multiple types of termination status to avoid employees being classified as Terminated when they are not, and apply that setting to all records.
Alternatively, map an AccountExtraField and IsQualify to a script function and IsQualify in PlanSource as follows:
- In
Function,
click tap
the plus button

. - From Category, select Custom Scripting.
- In Function, select Scripting.
- Click Tap OK.
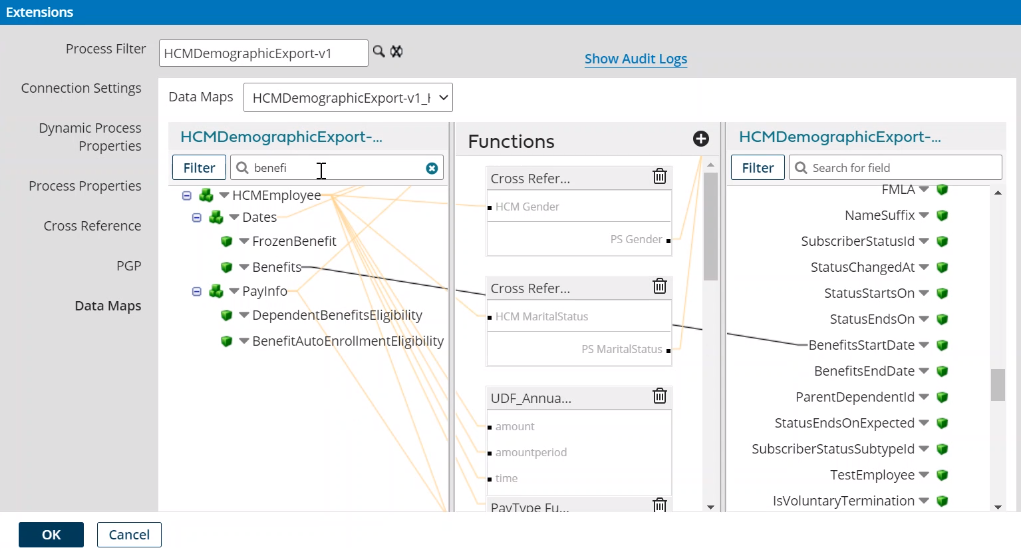
- In
Embedded Scripting, do the following:
In Select Script Source, select Use Inline Script.
In Language, select Groovy 2.4.
In Script to Execute, enter the following:
Result = falseif(DisqualifyValue != null &&DisqualifyValue.equalsIgnoreCase("yes") ||IsDisqualify.equalsIgnoreCase("true")){Result = true} - In
Inputs,
click tap
the plus button
.In Name, enter DisqualifyValue.
In Type, select Character.
Click Tap Add.
- In
Inputs,
click tap
the plus button
.In Name, enter IsDisqualify.
In Type, select Character.
Click Tap Add.
- In
Outputs,
click tap
the plus button
.In Name, enter Result.
Click Tap Add.
- Click Tap OK.
- (Optional) Configure default values or leave them blank. Click Tap OK.
- On the Source side, navigate to
AccountExtraFields and the first available
ExtraField.
Example: Select ExtraField3.
Connect Value to DisqualifyValue in the function that you created.
- On the Source side, navigate to IsDisqualify. Connect it to IsDisqualify in the function.
- On the Destination side, navigate to IsDisqualify. Connect Result in the function to IsDisqualify on the Destination side.
- Click Tap OK.
Base Compensation mapping
In order to export salary information correctly to PlanSource, you must enter Base Compensation in HCM by using only the allowed combinations of Amount Period, Time (Hours), Time Period, and PP (pay periods) in Year as follows:
Allowed Base Compensation mappings
Allowed Base Compensation mappings
Amount
Amount Period
Time (Hours)
Time Period
PP in Year
Annual
60000.00
YEAR
—
*
—
60000
5000.00
MONTH
—
YEAR
—
60000
1153.85
WEEK
—
WEEK
—
60000
1153.85
WEEK
—
PP
—
60000
1153.85
WEEK
—
MONTH
—
60000
1153.85
WEEK
—
YEAR
—
60000
28.85
HOUR
40
WEEK
—
60000
28.85
HOUR
173.3333333
MONTH
—
60000
Not allowed Base Compensation mappings
Not allowed Base Compensation mappings
Amount
Amount Period
Time (Hours)
Time Period
PP in Year
Annual
28.85
HOUR
—
PP
—
0
28.85
HOUR
—
YEAR
—
0
2307.69
PP
—
WEEK
—
120000
2307.69
PP
—
PP
—
0
2307.69
PP
—
MONTH
—
27692.30769
2307.69
PP
—
YEAR
—
2307.692308
Note: If the Benefit Salary is different from the Annual Salary, complete the initial load of benefit salaries by way of a file and the import integration. Afterward, you can import the data from new files or contact PlanSource for help. Benefit Salary is excluded from the import integration to ensure that updates correspond to plan rules. - On the Source side, navigate to
.
- When you finish, click tap Save or Save and Close.
Configure the PlanSource Deductions Import
HCM PlanSource Deductions Import integration
Select environment extensions
- In Administration, click tap
- In
Process Filter, the magnifying glass
. It can take several seconds before the button becomes active. - Scroll to and select the integration pack: .
Configure connection settings
- Select Connection Settings.
-
From the
Connection dropdown list, select and configure:
Setting
Required
Actions
APIGatewayServer
Required
(Optional) To change the default API gateway server:
- Clear Use Default.
- Enter the
URL to the server.
Example:
{
 CustomerTenantURL}/api
HCMAuthenticationServer
Required
(Optional) To change the HCM authentication server:
- Clear Use Default.
- Enter the URL to the server.
Example:
https://prd01-mws01.prd.mykronos.comPSAuthenticationServer
Required
The PlanSource authentication server controls the connection to the PlanSource environment.
(Optional) To change the server:
- Clear Use Default.
- Enter the
URL to the server.
Example:
https://api.plansource.com
Configure process properties
Process properties apply globally to all records that an integration processes. When you install the integration, you can define the parameter values or configure a prompt for the user to define the value when they run the integration.
- Select Process Properties.
-
Caution: Do not edit the default values of the AuthenticationProperties. By default, cookies are enabled and set the values for authentication properties.
Only while you test or design integration templates, should you edit the properties to connect to the authentication server and get the access token to execute APIs.
- From the Process Property dropdown list, select AuthenticationProperties.
- In GatewayDefaultPort, clear Use Default. Enter the path to the port for the API gateway.
-
Note: You no longer need an AppKey to call API operations. If one is defined, it is ignored.
-
From the
Process Property dropdown list, select
_External_HCMAuthenticationProperties to edit the properties to connect to the authentication server and get the access token to execute APIs.Caution: You must edit the HCMAuthenticationProperties for the account that accesses the APIs and all employee groups. This information is part of the tenant details.
Edit the following:
- userName: Clear Use Default. Enter the username.
- targetCompany: Default = Not Mapped. Clear Use Default. Enter the short name of the company exactly as it is defined in Dimensions HCM.
- password: Clear Use Default. Enter the password.
- api-key: The API key calls the HCM REST APIs from the HTTP request header. Clear Use Default. Enter the key for the destination.
- targetCompanyID: Default = Not Mapped. Clear Use Default. Enter the Company ID exactly as it is defined in Dimensions HCM.
-
From the
Process Property dropdown list, select
_External_PSAuthenticationProperties to edit the properties to connect to the authentication server and get the access token to execute APIs.Caution: You must edit the PSAuthenticationProperties for the account that accesses the APIs and all employee groups. This information is part of the tenant details.
Edit the following:
- clientID: Clear Use Default. Enter the identifier for the company exactly as provided by the PlanSource implementation team.
- secret: Clear Use Default. Enter a secret word that the person must enter in order to run the integration.
-
audience: Clear
Use Default. Enter the same URL as the
PSAuthenticationServer:
https://api.plansource.com - user: Clear Use Default. Enter the username of the person who has API access.
- lookupCode: Clear Use Default. Enter the same identifier as the clientID.
-
(Optional) HCMAPIErrorHandler properties define how the integration responds if an integration run exceeds an API limit.
Caution: In most circumstances, do not edit the HCMAPIErrorHandler properties; leave these settings at their default values.From the Process Property dropdown list, select _HCMAPIErrorHandler to change how to handle errors if integration runs exceed the limitations of an API.
-
MaxRetry: This property defines the maximum number of times to retry integration runs if errors occur.
Default = 5.
To change the number of retries:
Clear Use Default.
Enter the number of retries up to a maximum of 5.
-
TimeToWait: If an API limit is exceeded, this property defines how long to wait before sending the next API call.
Default = 60000 ms. If the API call has to be sent again, each repetition adds 60,000 ms (1 minute) to the wait time.
Examples:
1st TimetoWait = 60,000 ms (InitialTimeToWait)
2nd TimetoWait = 60,000 ms + 60,000 ms = 120,000 ms
3rd TimetoWait = 60,000 ms + (2 * 60,000 ms) = 180,000 ms
To change the initial wait time:
Clear Use Default.
Enter the wait time in milliseconds (ms) up to a maximum of 180000 ms.
Note: For hourly integrations, the maximum wait time between runs is 60,000 milliseconds (ms) (1 hour). -
MaxRetry: This property defines the maximum number of times to retry integration runs if errors occur.
-
From the
Process Property dropdown list, select
_CRTConfig to define headers in cross-reference tables.Caution: The Boomi™ application does not return default values for cross-reference table headers. You have to enter the headings in Value.
Cross-reference tables (CRT) are the look-up tables that the integrations use to translate parameter values. One or more data values from the source system can be used to assign one or more parameters in the destination system.
Enter the column headers exactly as follows:
PS Deduction Code,HCM Deduction Code,Exclude Code(T/F)Note: For details, see Configure Cross-Reference Tables. -
From the
Process Property dropdown list, select
_ProcessProperties to set process properties that must be configured before the integration can run.Caution: If you select Use Default for the connection settings and process properties, ensure that Value is blank. If Value is not blank, that value overrides the default value whether or not Use Default is selected or cleared. Example: If the default value is abc, but Value shows xyz, the integration uses xyz regardless of the setting of Use Default.
Property
Required
Actions
IncludeEmployees
Not required
Default = Include all employees.
To process data for only a limited group of employees:
- Clear Use Default.
- Enter the person numbers, as defined in the source system, each separated by a comma (
,) but no spaces.Example:
13997,15556,20012
QualifyHCMDelta
Not required
Default = false, import all records.
To import only changed records, including for new hires:
- Clear Use Default.
- Select Value.
QualifyDeltaLookBackDays
Not required
The number of days to search from today and earlier to get changed records.
Default = 1 day
- QualifyHCMDelta must be set to true.
- Clear Use Default.
- In Value, enter from 1—31 days.
Note: (Recommended) If you selected By Minute, lookback applies the last successful run as the lookback date.DeductionStartDate
Not required
Set this property for the initial import of deductions from PlanSource.
This property tells the system how far to look back for changes in PlanSource.
Set the DeductionStartDate to the day before the start date of the plan year (Plan Year Start Date — 1 day).
Example: If the plan year starts on January 1, set DeductionStartDate to December 31 of the previous year. If the plan year starts on July 1, set DeductionStartDate to June 30.
Note: In organizations that use only a single EIN, leave this property at the default setting.Note: If DeductionStartDate and QualifyDeltaLookBackDays are left on the default settings, the system looks back 1 day to find changes.- Make sure that QualifyHCMDelta is set to true.
- Enter the first date from which to import the deductions; use the format
YYYY-MM-DD. The DeductionStartDate takes precedence over QualifyDeltaLookBackDays.
Configure cross-reference tables
Cross-reference tables (CRT) are the look-up tables that the integrations use to translate parameter values. One or more data values from the source system can be used to assign one or more parameters in the destination system.
A cross-reference table (CRT) translates parameter values in an integration as follows:
- Organizes data values into rows and columns:
- Maximums = 20 columns, 10,000 rows.
- Can combine values from multiple columns to determine a single output value.
- If more than one row matches a reference value, the first match is the output value.
- If no match is found, the output value can be null, or the integration can produce errors.
-
Caution: For the cross-reference tables that you are customizing, make sure that Use Default is not selected in , and that the headers are defined.
- Select Cross Reference.
-
From the
Cross Reference dropdown list, select the
_DeductionCode table to map the deductions codes between systems.
You cannot change the names of the tables.
-
Select Override to:
- Download the tables when you run the integration
- Edit the table cells in Extensions
-
Enter the names of the deduction codes to map between systems in the following columns:
- PS Deduction Code: Deduction code in PlanSource
- HCM Deduction Code: Deduction code in Dimensions HCM
Caution: PlanSource is not case sensitive. However Dimensions HCM is case-sensitive, so make sure that you enter the exact names of the codes. -
In
Exclude Code for each mapping, enter one of the following:
- T= Exclude this code from the deductions import.
- F= Include this code in the deductions import.
- Configure the data in the cross-reference tables; see the Edit Cross-Reference Tables for PlanSource topic.
- When you finish, click tap OK.
Data mappings for PlanSource Deductions Import
This integration maps data between the systems as follows:
- EE Frequency Type = EveryScheduledPay
- EEFrequencyProperty = N
- EE Frequency Payroll Number = blank because this is assigned by the deduction code
- EE Amount Calc Method = Flat Amount
- EE Frequency Type = EveryScheduledPay
- EEFrequencyProperty = N
- EE Frequency Payroll Number = blank because this is assigned by the deduction code
- EE Amount Calc Method = Flat Amount
- Adjust End Date = Y