Edit a single shift
You can edit a shift directly within the schedule (quick shift edits) or you can use the Edit Shift slider for full functionality.
Quick shift edits
You can make the following shift edits directly within the schedule.
Change time or assign shift template
In the Table View
- Click a shift.
- Use the keyboard to enter either:
- A new start time, end time, or both. Use standard time-of-day format.
- The name of a shift template
- Save your changes.
Note:
In the Gantt View
when zoomed to the one day view, you can change a shift's start or end time by dragging the left or right border of the shift ahead or backwards in time (right or left). - Select a shift.
- Position the cursor over the left or right border of the shift so that it shows as a double-headed arrow.

- Drag the border to the left or right to move it back or ahead in time.
- Save your changes.
Move a shift to another employee on the same day
- Drag the shift up or down (on the same day) and drop it on the row of the employee you want to work the shift. Start and end times as well as other shift characteristics remain the same.
- Save your changes.
Move a shift to a different day or a different employee
You can move a shift to another day or another employee.
-
Right-click Tap a shift to open the glance, and
click tap Cut
. -
Right-click Tap any unlocked cell in the schedule and
click tap Paste
. You can repeat this step as many times as needed to paste the same shift anywhere. - Save your changes.
In both the Tabular view and the Gantt view of Schedule Planner, you can use drag and drop to move or copy a shift (including open shifts) or a schedule tag.
To move a shift or tag:
- Select the shift or tag, then drag it horizontally, vertically, or diagonally to another person or day.
To copy a shift or tag:
- Select the shift or tag, hold down the Ctrl key, then drag the shift or tag horizontally, vertically, or diagonally to another person or day.
The following conditions apply:
- If you move or copy a shift to an employee with a different job, the shift results as a transfer.
- You can move a shift by 15-minute increments if your selected date span is 1 or 2 days, or by 1-day increments if your selected date span is more than 2 days.
- You can move a shift by 1-minute increments (if your selected date span is 1 or 2 days) by holding down the Shift key while dragging the shift.
- You can copy a shift by 1-minute increments (if your selected date span is 1 or 2 days) by holding down the Ctrl + Shift keys while dragging the shift.
- You can move or copy a shift as long as it starts on a regular day even if it ends on a locked day.
- You can move or copy shifts into and out of the Open Shift summary row.
- When you copy a shift to another person or day, the start and end times of the shift are retained. However, if you are zoomed in to a 1-day or 2-day span in the Gantt view, you can copy the shift to a different time of day, which enables you to change the start and end time of the copied shift.
- Comments, notes, and schedule tags (except for predictive scheduling tags) associated with a shift are retained on the shift when it is moved or copied.
- You cannot move or copy a shift or tag to a group row, which includes the group row in the By Schedule Group and By Employment Terms views.
- In By Job View, you cannot move or copy a shift from one job to another.
- You cannot move or copy a shift or tag to a locked day, a terminated employee, or a signed-off employee.
- You cannot move or copy a locked shift.
- Predictive scheduling tags, leave time, and time-off requests cannot be moved or copied.
Copy and paste a shift
You can copy a shift and paste it somewhere else in the schedule.
-
Right-click Tap a shift and
click tap Copy
. -
Right-click Tap any unlocked day in the schedule and
click tap Paste
. You can repeat this step as many times as needed to paste the same shift anywhere. - Save your changes.
Move and resize breaks
schedule break usabilityIn the Gantt view of the Schedule Planner, you can change breaks within one or more shifts directly in the schedule cells. You must be in a view showing 48 hours or less, such as the daily view. You can move or resize breaks for all shift types -- assigned, open, Schedule Group, and Employment Terms. In the Schedule Group view, when you move or resize one break in the group, all associated shifts are modified.
Breaks are moved and resized by 15-minute increments. If you want to move or resize by 1-minute increments, hold down the Shift key while dragging the break. As you drag and drop a break, a tooltip displays the start and end times so you can see exactly where in the shift to drop it.
- Hover over the shift. The break displays with a blue border and blue carets at the start and end of the break.

- To resize a break, hover over the left or right caret. When the double arrow displays, drag the caret left or right to adjust the start time or end time.
- To move a break, drag the break
 left or right to reposition it without changing its duration.
 - Click Save.
Complete shift edits
To open the Edit Shift panel, double-click a shift (or right-click it and select Edit
Modify entire shift
Select More
-
Assignment displays only for employees who have multiple assignments. Select the assignment for which the shift is to be added.
When you edit an existing shift and select a new assignment, the regular segment of the shift becomes a transfer. If the original shift had a transfer segment to the job of the newly selected assignment, that segment becomes a regular segment.
-
Use Template sets the shift parameters to match the shift template you select.
When you select an on-call work rule, all segments on the shift must have an on-call work rule specified with the same call-in rule.
-
Change Shift Label enables you to modify the label that is displayed on the shift in the schedule. Shift labels are displayed when Shift Display > Shift Label is selected in the Show/Hide panel.
Note: Shift labels do not change automatically if you edit a shift. Example: If the shift label is 7a3p, and you change the end time to 4:00pm, the label is removed and is replaced by the shift start and end times.Note: The following behavior applies only if your system has been configured to synchronize shift labels.
-
When you add or modify a label on a shift, then click tap Apply:
-
The label is saved and displays on the shift if the new label matches an existing shift template label, and the segment start and end times of the shift template match those of the segments in the shift.
-
The label is saved and displays on the shift if there is no existing shift template with that label.
-
An error message displays if the new label matches an existing shift template label but the segments in the shift do not match those in the shift template.
Note: If there is no label specified in the shift template definition, the system uses the existing shift template name for comparison with new and modified shift labels. -
- If you delete a shift label, no label displays on the shift unless you manually enter a new label or reapply a new shift template.
-
Adjust start and end times of shift segments
Use the shift panel graphic to adjust the start and end times of any segment of the shift.
When you modify a shift, the shift label is removed from the shift if you change the shift start or end time, or if you change any shift segment times that do not affect the overall shift start and end time. The label is removed when you click Apply in the Edit Shift panel.
Shift labels are not removed when you add job levels, labor levels, work rule transfers, segment tags, or skills and certifications to a shift.
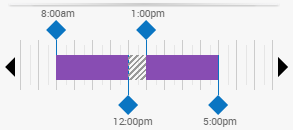
- Drag the blue diamond left or right to adjust the start or end time of a segment.
- If the start or end time you need is not visible (because it is beyond the left or right edge of the panel) select the left caret
or right caret to bring the desired time into view. - Drag the break left or right to reposition it without changing its duration.
Automatically adjust breaks
In the Shift Editor
When you create, modify, or move shifts, the system automatically adjusts the break within the shift to comply with the adjusted shift length or work rule transfer. Breaks are added or adjusted based on Automated Break Placement rules that are configured in employees' default work rules, such as required break length, time without a break, and coverage.
Automatic break adjustments apply to shifts created or modified in the Schedule and in the Shift Editor. The shift is visually updated in the Schedule to show the modified breaks.
In the Schedule, breaks are automatically added or adjusted when you:
- Resize a shift by dragging the start time or end time.
- Drag and drop a shift to a different employee.
- Drag and drop a shift to a different day.
- Right-click a shift and select Assign Breaks in the glance.
In the Shift Editor, breaks are automatically added or adjusted when you:
- Select Assign Breaks when creating or modifying a shift. A break is automatically added in the shift based on configured Automated Break Placement rules when you click Apply.
Note: If the Adjust breaks automatically setting is selected in the Schedule Planner configuration (or, if using the Staffing Dashboard, in the Staffing Dashboard configuration), the Assign Breaks option in the Add Shift slider is selected by default.
Assign Breaks may break one or more shift segments in two. In addition, when Assign Breaks is selected, if you already have a break defined or if you create manual breaks, a message displays that those breaks will be overwritten.
In Quick Actions and Glances
When you use Quick Actions or shift glances to insert a shift template or perform actions on shifts (assign, unassign, copy, paste, or swap), the system automatically adjusts the break within the shift to comply with the adjusted shift length or work rule transfer. Breaks are added or adjusted based on Automated Break Placement rules that are configured in employees' default work rules, such as required break length, time without a break, and coverage. The shift is visually updated in the Schedule to show the modified breaks.
In the Insert Shift Template slider
In the Insert Shift Template slider, breaks are automatically added or adjusted when you select Assign Breaks. A break is automatically added in the shift based on configured Automated Break Placement rules when you click Apply.
Assign Breaks may break one or more shift segments in two. In addition, when Assign Breaks is selected, if you already have a break defined or if you create manual breaks, a message displays that those breaks will be overwritten.
Add or change shift segments
- Click Add Segment.
- In the Add Segment editor, select the displayed segment type — for example, select Regular
— if you want to choose a different segment type to add. - Regular is the primary location and job of the employee, which also references (as applicable) the employee's primary work rule, payer cost center, and labor category.
- Transfer is the business structure (location and job), work rule, payer cost center, or labor category you define for this segment, for this employee. The Transfer panel appears.
Depending on your access rights, the jobs that display when you select Add Business Structure in the Transfer panel may only be employee-centric organizational jobs. These are the jobs that are included in the employee's transfer set, any additional jobs specified in the Manager Additions (configured in People Information), and the employee's primary job. This ensures that you select a job that is applicable for the employee.
Note: If you selected multiple employees, the list of available jobs that displays are those that are included in the job transfer set of the first selected employee and any additional jobs specified in the Manager Additions. If you choose a job that is not in a selected employee’s job transfer set or Manager Additions, that employee is not transferred. - Break is a default break.
- Enter the Start Time and End Time for the segment.
- Click Add. The shift graphical view and the shift details are updated to included the added segment.
- Click Tap
to see more options for modifying the segment: - Delete Segment removes this segment from the shift.
- Add Segment Tag attaches a tag to the segment to identify defined characteristics. The Add Segment Tag panel appears.
- Click Tap the check box for the tag or tags you want to add. To find a specific tag in a list of many, enter the first few letters of the tag name in the search field and press Enter.
- Click Tap Apply.
Note: You cannot add a tag to a break. - Add Skills and Certifications enables you to specify specific qualifications for a shift segment. The Skills and Certifications panel appears. Note: You cannot add skills and certifications to a break.
- Transfer Employee is an alternate method to define the segment as a transfer. The Transfer panel appears.
Depending on your access rights, the jobs that display when you select Add Business Structure in the Transfer panel may only be employee-centric organizational jobs. These are the jobs that are included in the employee's transfer set, any additional jobs specified in the Manager Additions (configured in People Information), and the employee's primary job. This ensures that you select a job that is applicable for the employee.
Note: If you selected multiple employees, the list of available jobs that displays are those that are included in the job transfer set of the first selected employee and any additional jobs specified in the Manager Additions. If you choose a job that is not in a selected employee’s job transfer set or Manager Additions, that employee is not transferred.For a business structure transfer, the Transfer slider displays the following depending on which action you are performing:
- When editing an existing shift, paycode, or schedule tag, the job on the shift is highlighted by default.
- When adding a new shift, paycode or schedule tag, the primary job of the employee for whom the shift transfer is being done is highlighted by default.
- When creating open shifts, the slider defaults to the root of the business structure to which you have access.
You can then either select the highlighted job or navigate to a different job.
- Click Apply.
Add comments
Add Comment allows you to attach a predefined comment to the shift by selecting it from a menu.
- To add a personal note to the comment, type in the box.
- To delete a comment or a note, select the
next to it. - Shifts with comments attached appear like this on the schedule:
