Attestation Models
The Attestation Models page lists all Attestation models that have been created and includes the following information for each of these models:
- Model Name
- Unique ID
- Description
- Version (All versions of the model are saved.)
- Last Updated By
- Last Updated
You can create, edit, deploy, and delete models from this page. The process of creating and editing models involves using the Workflow Designer. For more information, see the Business Processes Developer's Guide.
Preconfigured Attestation models
You can customize the following preconfigured models to meet your specific needs.
Attestation Paycode v3
With the Attestation Paycode form, you can enable the system to make a paycode edit when an employee answers an attestation question after punching. This can be used to add a paycode if an employee is requested to return early from a break.
Here is how it works: The employee punches out for the day. A panel opens with the following question, for example:
Question: Do you have any travel time to report?
Answer 1: "Yes." Another panel opens and the employee enters the date, amount, and notes (which is attached to a comment in the timecard), then clicks Submit.
Answer 2: "No." The workflow ends.
This form could also be modified for adding tips when employees punch out, for example:
Confirm: Do you have any tips to declare?
Answer 1: "No." The workflow ends and no paycode is added.
Answer 2: "Yes." Another panel opens and the employee enters the date, amount, and notes (which is attached to a comment in the timecard), then clicks Submit.
The form can be also be used at a data-collection device. Depending on the answer, a paycode edit can be triggered at the clock in a new complex form. The employee enters the date (which is enforced by the workflow), an amount, and notes as free-form text.
Attestation Paycode for Manual Time Entry v2
With the Attestation Paycode for Manual Time Entry workflow, you can enable the system to make a paycode edit when an employee answers an attestation question after punching using My Timecard. This workflow can be used to add a paycode if an employee is requested to return early from a break, for example.
Here is how it works: The employee punches out for the day. A panel opens with the following question, for example:
Question: Do you have travel time to report?
Answer 1: "Yes." Another panel opens and the employee enters the date, the amount of travel time in hours, and notes (which are attached to a comment in the timecard), then clicks Submit.
Answer 2: "No." The workflow ends.
This form can also be modified for adding tips when employees punch out, for example:
Confirm: Do you have any tips to declare?
Answer 1: "No." The workflow ends and no paycode is added.
Answer 2: "Yes." Another panel opens and the employee enters the date, amount, and notes (which is attached to a comment in the timecard), then clicks Submit.
The form can be also be used at a data-collection device. Depending on the answer, a paycode edit can be triggered at the clock in a new complex form. The employee enters the date (which is enforced by the workflow), an amount, and notes as free-form text.
Cancel Specified Meal Break v2
The Cancel Specified Meal Break form is a workflow that enables employees to cancel the first, second, or both meal breaks in a shift so they can be paid for the break or breaks not taken. When both meal breaks are canceled, all breaks for the shift are canceled.
-
Answer 1: "Yes." This response is followed by this question:
"Did you take your second break?"- "Yes." Since the employee took both breaks, the system applies the automatic break deduction to both breaks and neither break is canceled.
- "No." Since the employee took the first break but did not take the second break, the system applies the automatic break deduction to the first break but cancels the automatic deduction for the second break.
-
Answer 2: "No." This response is followed by this question:
"Did you take your second break?"- "Yes." Since the employee did not take the first break but did take the second break, the system cancels the automatic break deduction for the first break but applies the automatic deduction for the second break.
- "No." Since the employee did not take either break, the system cancels the automatic break deduction for both breaks.
Cancel Specified Meal Break for Manual Time Entry v2
This model is based on the Cancel Specified Meal Break model but includes the following:
- The workflow object has been updated to define the Punch Button vs Manual Time Entry Workflow model assignment
- Workflow list page includes an additional column for the manual entry assignment
Complex Meal Form v4
The Complex Meal Form is a workflow with one question and two answers, one of which triggers another question with multiple answers. This form can be used to have employees attest that they took a meal break and if not, select a reason why, for example:
Question: "Did you take a meal break?"
-
Answer 1: "Yes." The workflow ends.
-
Answer 2: "No." An additional question appears.
Question: "Why?" A number of reasons are listed.
- Answer 1: "I didn't want to take a meal break." The workflow ends.
- Answer 2: "I forgot to punch out." The system enters the meal deduction and sends a notification to the manager.
Complex Meal Form for Manual Time Entry v3
The Complex Meal Form for Manual Time Entry is a form used with a manual time entry workflow with one question and two answers, one of which triggers another question with multiple answers. This form can be used to have employees attest that they took a meal break and if not, select a reason why, for example:
-
Answer 1: "Yes." The workflow ends.
-
Answer 2: "No." An additional question appears.
Question: "Why?" A number of reasons are listed.
-
Answer 1: "I didn't want to take a meal break." The workflow ends.
-
Answer 2: "I forgot to punch out." The system enters the meal deduction and sends a notification to the manager.
-
Complex Meal Form with Paycode v3
The Complex Meal Form with Paycode is essentially the same as the Complex Meal Form except that a paycode can be added based on the employee's answer.
The form consists of one question and two answers, one of which triggers another question with multiple answers. This form can be used to have employees attest that they took a meal break and if not, select a reason why, for example:
Question: "Did you take all of your breaks?"
Answer 1: "Yes." The workflow ends.
Answer 2: "No." An additional question appears.
Question: "Why?" A number of reasons are listed. Based on the employee's answer, a paycode is added to the employee's timecard.
-
Answer 1: My decision." The workflow ends.
-
Answer 2: "Company request." The system enters adds a paycode to the employee's timecard.
-
Complex Meal Paycode for Manual Time Entry v2
The Complex Meal Form with Paycode is essentially the same as the Complex Meal Form with Paycode except that a paycode is added based on the employee's answer when they punch from My Timecard.
The workflow consists of an initial question and two answers, one of which triggers another question with multiple answers. This form can be used to have employees attest that they took a meal break and if not, select a reason why, for example:
Question: "Did you take all of your breaks?"
-
Answer 1: "Yes." The workflow ends.
-
Answer 2: "No." An additional question appears.
Question: "Why did you not take all of your breaks?" A number of reasons are listed. Based on the employee's answer, a paycode is added to the employee's timecard.
-
Answer 1: My decision." The workflow ends.
-
Answer 2: "Company request." The system enters adds a paycode to the employee's timecard.
-
Daily Attestation Form v3
The Daily Attestation form displays an attestation message if there is unapproved time. Although typically used for daily attestation, the form can be used for other time frames. The default message is:
Sample text - do you want to attest to and approve your time for today %tcReview%
You can customize the sample text in Workflow Designer, but do not change the %tcReview%
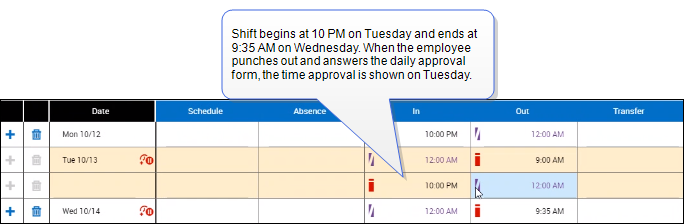
When an employee punches out at the end of a shift that crosses the day divide (for example, a third shift) and answers the daily approval question, the approval is recorded on the day on which the shift began. For example:
Fix Missing Punches v3
Using the Fix Missing Punches form, employees who cannot edit their timecards can fix missing punches or punches for unexcused absences directly from the Attestation Confirm panel.
When an employee punches and the employee has one or more missing punches or unexcused absences, the Confirm panel opens so the employee can correct the punches, one by one. The missing information is displayed in chronological order. For example:
Question: You currently have x missing punches in your timecard. Would you like to fix them?
-
Answer 1: "Yes." A new panel opens with the following information for the first day that has missing punches:
Summary of Punches by Shift with a list of the punches that need to be fixed for the first shift.
Current Punch to Fix with the specific punch (in- or out-punch) that needs to be fixed.
The employee selects the date in the Punch Date field, enters the time in the Punch Time field, optionally adds a note, and clicks Next.
If there is another missing punch on the same day, a new panel opens with the next punch to fix.
If there are missing punches on the next day, a new panel opens that displays Summary of Punches by Date and Current Punch to Fix. The employee corrects each punch until the panel closes.
-
Answer 2: "No." The panel closes.
If the employee has an unexcused absence, the Confirm panel opens.
Question: You currently have x missing punches in your timecard. Would you like to fix them?
- Answer 1: "Yes." A new panel opens with the following information:
Summary of Punches: Unexcused Absence for date.
Current Punch to Fix and lists the in- and out-punches that need to be fixed. Then, the type of punch to fix is described, for example: Fix the missing in-punch for the absence span.
The employee selects the date in the Punch Date field, enters the time of the in-punch in the Punch Time field, optionally adds a note, and clicks Next.
The next panel displays the same information, except the out-punch is listed, for example, Fix the missing out-punch for the absence span.
The employee selects the date in the Punch Date field, enters the time of the out-punch in the Punch Time field, optionally adds a note, and clicks Next. The panel closes.
- Answer 2: The panel closes.
Geolocation Consent Form v4
The Geolocation Consent Form presents a form to employees that allows them to consent to having their location collected by their device. This form is used to collect location data from only those employees who are configured to have their location data collected within their Function Access Profile. A common scenario is that employees can be prompted when they are punching for the first time on their devices to give their consent.
When employees are punching for the first time on their devices, they can be prompted with the consent form, for example:
- Question
: "Do you agree to your location being collected as per company agreement?"
- Answer 1: “Yes.” The employee consents to having geolocation data collected.
- Answer 2: “No.” The employee does not consent to having geolocation data collected.
After selecting an answer, the employee clicks either Submit or Cancel:
- Submit: The system uses the employee’s Function Access Profile configuration to either collect or not collect geolocation data. The system processes the employee’s “No” response depending on how their Allow without accurate geolocation Function Access Control Point is configured.
- Allowed: The system processes the punch but no geolocation data is collected.
- Disallowed: The system does not process the punch and no geolocation data is collected.
- Cancel: The transaction is terminated.
Meal Lockout Form v3
The Meal Break Lockout form enables organizations with strict rules for meal or rest breaks to create a workflow that prevents employees from returning to work too early. The workflow includes a statement that the employee is clocking in too early and when to clock in, for example:
Statement 1: You are returning from break too early.
Statement 2: Please punch back in 3 minutes.
The Meal Lockout form can also be used to create a Waive Short Meal Penalty workflow to enable organizations to allow employees to attest that they are returning from a meal or break on their own volition or that their job requires an early return. For example:
Question: You are returning too early. Do you agree to waive the short break penalty?
Answer 1: "Accept." The system cancels the paycode.
Answer 2: "Work requires me to return early." The system accepts the punch.
Meal Lockout Form for Manual Time Entry v2
The Meal Lockout Form for Manual Time Entry is essentially the same as the Meal Lockout Form: It enables organizations with strict rules for meal or rest breaks to create a workflow for manual time entry that prevents employees from returning to work too early. The workflow includes a statement that the employee is clocking in too early and when to clock in, for example:
Statement 1: You are returning from break too early.
Statement 2: Please punch back in 3 minutes.
The Meal Lockout form can also be used to create a Waive Short Meal Penalty workflow to enable organizations to allow employees to attest that they are returning from a meal or break on their own volition or that their job requires an early return. For example:
Question: You are returning too early. Do you agree to waive the short break penalty?
Answer 1: "Accept." The system cancels the paycode.
Answer 2: "Work requires me to return early." The system accepts the punch.
Missed Punch v2
The Missed Punch form identifies missed punches or unexcused absences so employees can correct their time before the end of the pay period. The flow consists of one question, for example:
You have missed punches or unexcused absences in your timecard. Do you want to edit your time?
If the employee selects Yes, the timecard opens so he or she can correct the time. If the employee select No, the flow ends.
- To ensure correct processing of paycodes, associate the Missed Punch workflow only with Attestation buttons whose Timecard Timeframe value is in the past, such as Yesterday, Yesterday Minus 13 days, and so on.
-
When used by a web employee, punch data is not collected until the employee clicks Continue Attestation and any subsequent workflows are processed. To ensure proper collection of punch data and to allow the use of timecard approval attestation flows in web applications, use Missed Punch Redirect v2.
-
Note: This model does not support Attestation template mapping.
- This model does not support Manual Time Entry. See Configure Manual Time Entry for more information.
Missed Punch Redirect v2
The Missed Punch Redirect form, which is similar to the Time Review Redirect Form, identifies missed punches or unexcused absences so employees can correct their time before the end of the pay period.
Here is how it works: The employee adds a punch in the Time Stamp tile. A panel opens with the following question:
Confirm. You have missed punches or unexcused absences in your timecard. Do you want to edit your time?
Answer 1: "Yes."
- If the punch is valid, the punch is recorded, the "Punch Accepted" message appears, and the timecard opens with the punch recorded. Depending on the employee's permission, the employee can correct the missed punches or unexcused absences as well as review, save, and approve the timecard.
- If the punch is not valid, an error displays, the punch is not recorded, and the timecard does not open.
Answer 2: "No." The punch is accepted, the panel closes, and the timecard does not open.
Predictive Scheduling v3
If you use predictive scheduling, the system ensures compliance with legislation that requires employers to compensate employees for late scheduling changes.
The Predictive Scheduling workflow (which uses the Scheduled Shifts condition) determines if the employee is eligible for predictability pay when they punch out and asks the employee to attest why they worked hours different from the schedule. For example:
Question: "Did your manager request you to work different hours?"
Answer 1: "No." The system does not pay out any predictive pay.
Answer 2:" Yes." The system creates a predictive scheduling tag in the employee's timecard and pays out predictive pay.
Note that you might have to click tap refresh
See Configure Predictive Scheduling for more information.
Predictive Scheduling for Manual Time Entry
This model, based on the Predictive Scheduling model, supports Attestation when employees punch out using My Timecard. If you use predictive scheduling, the system ensures compliance with legislation that requires employers to compensate employees for late scheduling changes.
The Predictive Scheduling for Manual Time Entry workflow (which uses the Scheduled Shifts condition) determines if the employee is eligible for predictability pay when they punch out and asks the employee to attest if they worked hours different from the schedule. For example:
Question: "Did your manager request you to work different hours?"
Answer 1: "No." The system does not pay out any predictive pay.
Answer 2:" Yes." The system evaluates whether the punch is eligible for predictive pay. If it is eligible, the system adds the paycode to the corresponding entry in the employee's timecard and creates a predictive scheduling tag in the employee's schedule.
Note that you might have to click tap refresh
See Configure Predictive Scheduling for more information.
Simple Question Form v4
The Simple Question Form template is a workflow with one question and two answers. One of the answers sends a notification. This form can be used to have employees attest that they feel safe at work and other simple questions, for example:
Question: "Do you feel safe at work?"
- Answer 1 : "Yes." The workflow ends.
- Answer 2 : "No." A notification is sent to the manager.
Simple Question Form for Manual Time Entry v3
The Simple Question Form for Manual Time Entry is essentially the same as the Simple Question Form: It is a workflow with one question and two answers, but it can be invoked when an employee answers an attestation question after punching using My Timecard. One of the answers sends a notification. This form can be used to have employees attest that they feel safe at work and other simple questions, for example:
Question: "Do you feel safe at work?"
Answer 1: "Yes." The workflow ends.
Answer 2: "No." A notification is sent to the manager.
Time Review Form
The Time Review form allows employees to review timecards for approval and to attest to any times that were changed. This model starts with a question and two answers. The first answer causes the timecard to open. The second answer ends the workflow. For example, you could configure the following workflow:
Question: You have not attested to and approved your timecard for the previous pay period. Do you want to review your timecard now?
-
Answer 1: "Yes." The timecard opens in a state defined by the employee’s permissions and includes a Continue Attestation button. When the employee clicks this button, another question appears in the panel, for example:
Do you approve and attest to your timecard? By selecting approve you attest that your timecard is accurate.
-
Option 1: Select Approve and click Submit. The approval is recorded and the panel closes and returns to the home screen.
-
Option 2: Select Cancel and click Submit. The panel closes.
-
-
Answer 2: "No." The timecard is not approved.
You can configure this workflow as part of the review timecard process or when the employee punches in at the start of a new pay period.
- To ensure correct processing of paycodes, associate the Time Review Form workflow only with Attestation buttons whose Timecard Timeframe value is in the past, such as Yesterday, Yesterday Minus 13 days, and so on.
-
When used by a web employee, punch data is not collected until the employee clicks Continue Attestation and any subsequent workflows are processed. To ensure proper collection of punch data and to allow the use of timecard approval attestation flows in web applications, use Time Review Redirect v2.
-
Note: This model does not support Attestation template mapping.
- This model does not support Manual Time Entry. See Configure Manual Time Entry for more information.
Time Review Redirect v2
The Time Review Redirect form allows employees to add a punch and then review their timecard. Note that this form records the punch and ends the workflow once the employee is redirected to the timecard. This form is designed to be used with approval, sign-off, and save workflows.
Here is how it works: The employee adds a punch in the Time Stamp tile. A panel opens with the following question:
Confirm. Do you want to review your timecard?
-
Answer 1: "Yes." If the punch is accepted, the workflow ends, the punch is recorded, a "Punch Accepted" message appears, and the employee's timecard opens. If the punch is not accepted, the workflow ends, the panel closes, an error message displays, and the employee's timecard does not open.
-
Answer 2: "No." The panel closes and the timecard does not open.
Timecard Approval Restriction v2
The Timecard Approval Restriction form can be used to force employees to correct missing punches before their timecard can be approved.
Here is how it works: When an employee clicks Approve on the timecard and there are missing punches, a panel opens with the following statement:
Confirm: You have missing punches. Fix your missing punches before approving your timecard.
Option 1: The employee clicks Cancel. The timecard is not approved.
Option 2: The employee clicks OK. The timecard opens, the employee fixes the missing punch, and clicks Approve again.
A new panel opens with the following statement:
Confirm: By selecting approve, you attest that your timecard is accurate.
Option 1: The employee clicks Approve and Submit. If there are no errors on the timecard, the panel closes, the timecard is approved, and a success message appears: "Timecard approved successfully."
Option 2: The employee clicks Cancel and Submit. The panel closes and the timecard is not approved.
Timecard Approve v2
The Timecard Approve form is used by employees who do not use Time Stamp functionality. It requires employees to attest that the hours on their timecards are accurate. This form can be used by hourly or project timecard employees.
If you use this model as the basis for another model, be aware of the following:
- It can only be used for web applications — desktop, mobile, or tablet implementations. It cannot be used on devices.
- It requires a button type of Timecard Action and sub-type of Approve. The model is not supported in combination with other button types that present as Attestation Punch buttons on the homepage tile.
When an employee clicks Approve on the timecard, a panel opens with an attestation question (such as, "By selecting approve, you attest that your timecard is accurate.") along with an Approve/Cancel radio button and a Submit button.
- If the employee clicks Approve and there are no errors on the timecard, the panel closes, the timecard is approved, and a success message appears: "Timecard approved successfully."
- If the employee clicks Cancel, the panel closes and the timecard is not approved.
Configure automatic comments for manual time entry Attestation workflow models
Using the Initialize Variables task and the Script task, you can modify manual time entry Attestation workflow models to include an automatic comment for timecard punches. To do this:
- In UKG Pro Workforce Management, specify the comment you want the system to add to the punch. The comment must be specified in the Punches category. See Comments for more information.
- In Workflow Designer, specify the comment as a variable value in the model's Initialize Variables task. Then add a Script task and include a script that references that variable. See the "Configure automatic comments for manual time entry Attestation workflow models" topic in the Business Process Developer's Guide for more information.
Create a model
To create a model, simply enter a model name and description that you can then access to create a workflow.
You create a model in UKG Pro Workforce Management. You then edit the model to specify and configure it. You edit models in the Workflow Designer. For more information, refer to the Business Process Developer's Guide.
- Click New
. - In the Create Attestation Model page in UKG Pro Workforce Management, enter a model name and description.
Note: Earlier versions of the Simple Question Form and Complex Meal Form templates are also available on the page (). For more information, see Use the out-of-the-box templates.
- Click Save. The model is now listed in the Attestation Models grid.
- To create a workflow, select the model and click Edit
. For more information about using Workflow Designer, refer to the Business Process Developer's Guide.
Copy a model
-
Select a model and click
Copy
. - On the Create a copy of Process Model page, enter the name of the copied model and, optionally, enter a description.
- Edit the copied model as needed.
Edit a model
Editing a model opens the Workflow Designer used by the Business Process component. For more information about using Workflow Designer, refer to the Business Process Developer's Guide.
- Select a model and click Edit
. The Workflow Designer opens in a new window. - Edit a workflow as described in .
Caution: When modifying the attestation label, do not change any text enclosed in percentage signs, for example, %tcReview%. This information is a system variable that is used to fetch the appropriate data.
- Click Save.
Deploy a model
Select the model and click
Deploy
Delete a model
-
Select a model name and click Delete
- Click Yes in the warning message.
- Click Save.
Change the columns
- Select a model name and click Column Selection .
- In the Column Selection glance, select the columns to appear
- Click Save.
Indicators
Column Selection — Show or hide the columns displayed