Monthly Vacation Grants
This integration calculates monthly accruals to comply with vacation grant regulations in Finland.
With this integration,
- Employees receive their monthly vacation accrual grant on the correct day of the month.
- Payroll Managers can export correct accrual statements that comply with Finnish labor law.
Grants differ by type of employee, as follows:
- Full-time employees: The monthly vacation grant must be given on the 14th working day of each month.
- Grant of 2 days each month during the first year of service; 2.5 days each month every year after.
- Grants are suspended for days of absence — such as sick or personal leave — these days are assimilated within the total of worked days to a maximum of 75 days each year.
- Part-time employees: The monthly vacation grant must be given on the day in the month when the employee has worked more than 35:00 hours.
- Grant of 2 vacation days each month during the first year of service; 2.5 days each month every year after.
- Grants are suspended for days of absence — such as sick or personal leave — these days are assimilated within the total of worked days to a maximum of 105 days each year.
Use cases
Full-time and part-time employees
Two employees have been employed by an employer longer than 1 year so the monthly vacation grant is 2.5 days.
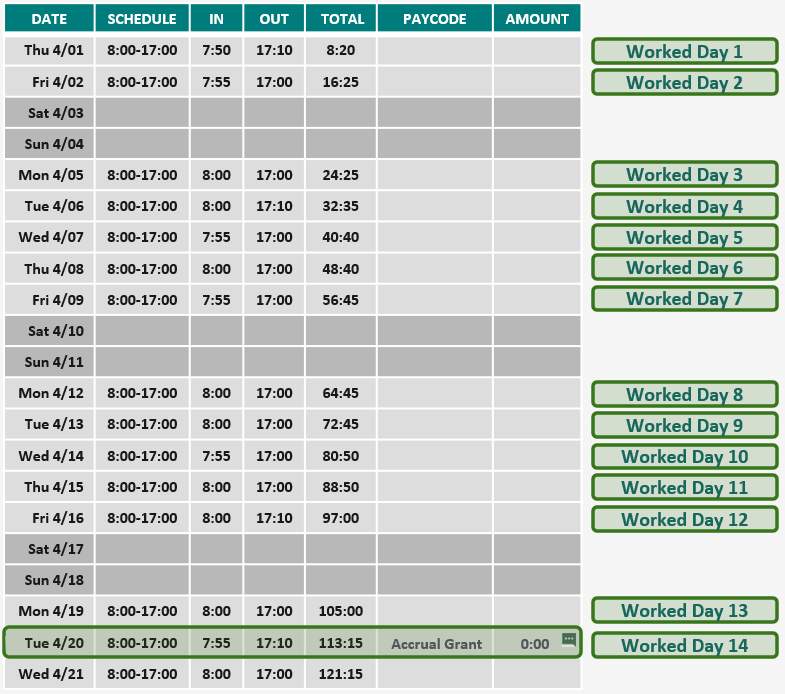
For the full-time employee, the grant is given on the 14th working day of the month.
Example: The vacation grant is given on April 20.
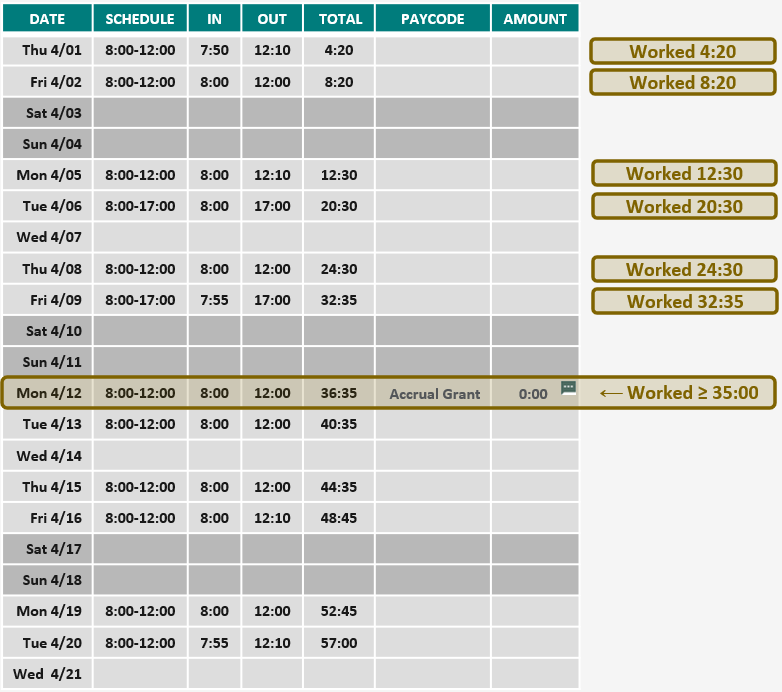
For the part-time employee, the grant is given on the day the employee has worked 35 hours that month.
Example: The vacation grant is given on April 12.
Assimilated absences
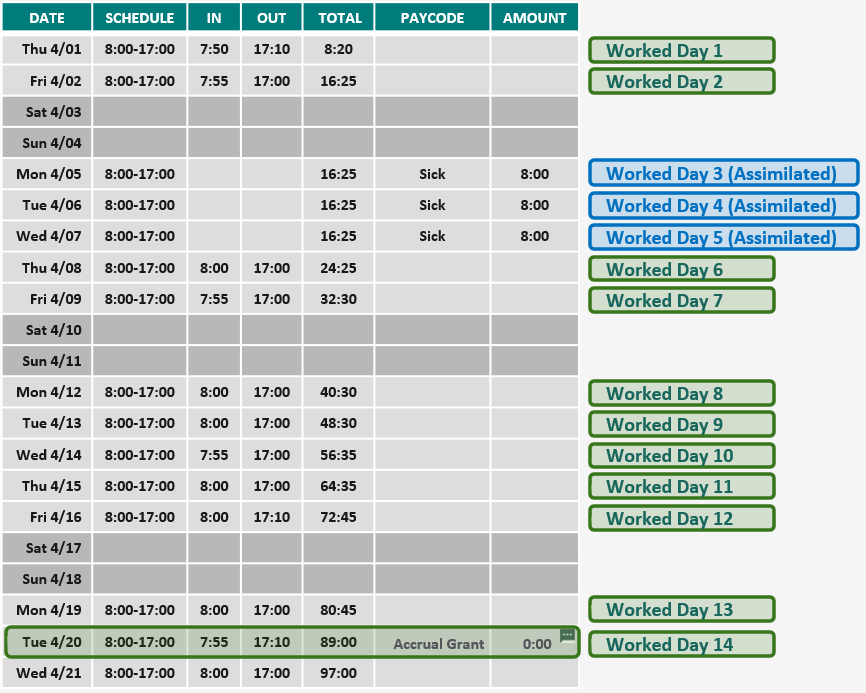
So long as the total count of absences in the accrual year is less than 75 days for full-time employees or 105 days for part-time employees, a sick day counts as a worked day to define the grant day. When the maximum number of days of absence is reached, further sick days are no longer counted as worked days.
Example: A full-time employee has less than 75 sick days that year
Example: A full-time employee has 73 sick days accumulated that year

Before you start
Before you configure this integration, you must do the following:
- Configure Access to Integrations.
- Configure the following:
- Accrual profiles: Configure accrual codes, policies, and profiles as follows:
- Create an accrual code: Enter a Name, set the Accrual Type to Days, and enter the number hours that constitute a day in
hh:mmformat. See the Accrual codes topic. - Link the accrual code to an accrual policy, do not configure the grant. See the Accrual policies topic.
- Assign the accrual policy to an accrual profile, then to the employees by one of the following methods:
- Select Main Menu
— See the Accrual profiles topic. - Select Main Menu
— See the Employment Terms topic.
- Select Main Menu
- Create an accrual code: Enter a Name, set the Accrual Type to Days, and enter the number hours that constitute a day in
- Combined paycode: Create four combined paycodes to define whether to consider time as worked or excluded. Summarize the combined paycodes into days and hours, and then configure each as Visible in Report Options and Report Totals and Visible on Totals tab in Timecard. See the Combined Paycodes topic.
Examples include:
-
FI-Worked Hours: Includes Regular, Overtime, and so on.
-
FI-Worked Days: Includes Training Day, and so on.
-
FI-Excluded Hours: Includes Sickness, Family Emergency, and so on.
-
FI-Excluded Days: Includes Vacation Day, Personal Day, and so on.
-
- Hyperfind: Configure a public Hyperfind query, such as
AbsenceAveraging, for the employees who are subject to monthly vacation grants. See the Hyperfind Queries topic. - (Optional) Paycode: Configure a paycode to indicate grants on the Timecard on the day when the accrual grant is given. See the Paycode definition topic.
- (Optional) Comment: Configure a comment that the integration attaches to the paycode in the Timecard. The paycodes category must be selected during configuration. See the Comments topic.
- (Optional) Note: Configure notes for the comments of the paycode to specify extra details. Example:
Excluded Days until last month: <value of excluded days>. - Extension table: Create an extension table using the DDL specified in the integration template. See the Extension Tables topic.
- Accrual profiles: Configure accrual codes, policies, and profiles as follows:
-
Get the URL, User, and Password for the APIGatewayServer.
Configure the Monthly Vacation Grants integration
- Deploy the Monthly Vacation Grants integration
Note: For more information, see the Deploy Integration Packs to your Atom topic.
-
Open the Integration Template Designer: Select Main Menu
. Note: If prompted, enter your Username and Password. Click Tap Log in. -
Make sure that the Account is correct. If not, select the right account.
- Select the Deploy tab > Integration Packs.
- From the list in the left column, search for and select the Pro WFM Monthly Vacation Grants Extension integration. Note: If the integration does not display, select Browse Integration Packs to search for and select the iPack.
-
Click Tap Install.
-
From Unattached Environments, select the environment in which to deploy the integration process for the selected integration. Click Tap the double-left arrows button
 .
.
-
- Configure the Monthly Vacation Grants integration settings
- Select the environment
- Select the Manage tab > Atom Management.
- Select your environment.
- Select environment extensions
- In Administration, click tap Environment Extensions.
- In Process Filter, click tap the magnifying glass
 . It can take several seconds before the button becomes active.
 - Scroll to and select the integration pack: .
- Select the environment
- Configure connection settings
Caution: If you select Use Default for the connection settings and process properties, ensure that Value is blank. If Value is not blank, that value overrides the default value whether or not Use Default is selected or cleared. Example: If the default value is abc, but Value shows xyz, the integration uses xyz regardless of the setting of Use Default.
- Select Connection Settings.
-
From the Connection dropdown list, select and configure the following:
Connection Settings
Connection Settings for the Virtual Roster Employee Demographics Export integration
Setting
Required
Actions
MonthlyVacationGrants_iPack_v2_APIGatewayServer
Required
To change the default API gateway server:
- Clear Use Default.
- Enter the URL to the server.
Example:
<tenantURL>/api
MonthlyVacationGrants_iPack_v2_DataBaseServer
Required
The database server setting defines the connection to the file that contains the records.
To change the default server parameters:
- For each field, clear Use Default.
- Enter the following values:
In User, enter the username for the server.
In Password, select <Encrypted>. Enter the password for the server. Click Tap Apply.
Enter the Class Name.
Enter the Connection URL for the database server.
MonthlyVacationGrants_iPack_v2_VacationGrant
Required
Enable Override.
- Configure process properties
- Select Process Properties. Caution: Do not edit the default values of the AuthenticationProperties. By default, cookies are enabled and set the values for authentication properties.
-
Select MonthlyVacationGrants_iPack_v2 to set process properties that must be configured before the integration can run. This main process starts the integration process and handles errors.
Process properties
Process properties
Process property name
Column header value
_MonthlyVacationGrants_iPack_v2_VacationGrant_CRT
Accrual Profile, Accrual Code, Seniority Level, Seniority Period (months), Time Of Grant, Time Of Grant Unit (days/hours), Sickness Rule (in days), Grant Amount
- Select Process Properties.
- Configure cross-reference tables
Cross-reference tables (CRT) are the look-up tables that the integrations use to translate parameter values. One or more data values from the source system can be used to assign one or more parameters in the destination system.
Note:- If more than one row matches a reference value, the first match is the output value.
- If no match is found, the output value can be null, or the integration can produce errors.
- Select Cross Reference.
-
From the Cross Reference dropdown list, select the MonthlyVacationGrants_iPack_v2_VacationGrant_CRT table.
-
Select Override to:
- Download the tables when you run the integration
- Edit the table cells in Extensions
- When you finish, click tap OK.
MonthlyVacationGrants_iPack_v2_VacationGrant_CRT: Stores configuration parameters of the different accrual profiles.
Monthly Vacation Grants — Vacation Grant CRT structure
Monthly Vacation Grants - Vacation Grant CRT structure
Column name
Description
Accrual Profile
The accrual profile that is assigned to the employees.
Accrual Code
The accrual code that is used to calculate the grant.
Seniority Level
The setting whether to define grants based on Hire Date or Seniority Date.
Seniority Period (months)
The period of the seniority in months.
Time Of Grant
The time in the month when the grant is given; must be a decimal value.
Example: For 35 hours and 30 minutes, enter30.5, not30:30.Time Of Grant Unit (days/hours)
The unit of the threshold for the time of the grant, based on the number of worked days or hours.
Sickness Rule (in days)
The maximum number of sick days that can be assimilated as worked days over an accrual year.
Grant Amount
The vacation grant that is credited to the employee.
Install the Monthly Vacation Grants integration
After the integrations are deployed and the connection settings and process properties are configured, install the integrations to make them available for running or scheduling.
- An integration template is the configured integration that you deploy to an Atom and then install to make available for running or scheduling.
- An installed integration is a single instance of an integration that is based on an integration template. When you install an integration, you can define parameters or set parameters to be defined when the integration is run.
- Select Main Menu
. - Click Tap Create
. - In Integration Name, enter a unique name, such as
MonthlyVacationGrants_iPack_v2. - (Optional) Enter a Description.
Note: Do not select API Integration.
- In File Access, select None to not select a connection.
- (Optional) If the person who runs the integration doesn't have full access to integrations, select Execute Integration with System Account. This allows the integration access to all APIs in the FAP, and the relevant permissions and data, regardless of the FAP and GDAP of the person who runs the integration.
-
(Optional) Select Re-Run to allow repeated runs of the integration with the same parameter values as the previous run.
-
Email Notifications
(Optional)
- Select Yes to send email and control center notifications for integration runs.
- Enter the email addresses of the recipients for the following types of run status. For multiple recipients, separate the addresses by a comma, but no spaces:
In Progress — The integration run started and has not finished.
Completed — The integration ran successfully without errors.
Failed — The integration ran successfully, but one or more records have errors. The integration run is treated as failed. If Abort on Failure is configured in an integration set, the integration set stops.
Completed with Errors — The integration run has errors or could not run.
- In Skip Configuration, select None (default) to allow multiple integrations to run at the same time or with the same data without restrictions.
Note: Do not select Allow Minute Interval.
- Integration template and parameters
- In Integration Template, select MonthlyVacationGrants_iPack_v2.
- Click Tap Assign
. - In Integration Parameters, you can override default settings. Click Tap Create
. - Complete the configuration for each parameter value.
- Click Tap Save.
Repeat this step for each integration control parameter that supports the Monthly Vacation Grants process.
Integration Parameters
Process Properties for this integration
Parameter name
Description / User prompt / Mandatory
Template parameter
Parameter type
Accrual Year
The start date of the vacation accrual year.
Enter the date in
MM-DDformat.Default =
04-01User prompt = No
Mandatory = Yes
AccrualYear(MM-dd)
Text
Combined Paycode — Excluded Days
The combined paycode that holds all paycodes for not-worked days.
Default =
FI-Excluded Days.User prompt = No
Mandatory = Yes
CombinedPaycode-ExcludedDays
Text
Combined Paycode — Excluded Hours
The combined paycode that holds all paycodes for not-worked hours.
Default =
FI-Excluded Hours.User prompt = No
Mandatory = Yes
CombinedPaycode-ExcludedHours
Text
Combined Paycode — Worked Days
The combined paycode that holds all paycodes for worked days.
Default =
FI-Worked Days.User prompt = No
Mandatory = Yes
CombinedPaycode-WorkedDays
Text
Combined Paycode — Worked Hours
The combined paycode that holds all paycodes for worked hours.
Default =
FI-Worked Hours.User prompt = No
Mandatory = Yes
CombinedPaycode-WorkedHours
Text
Current Run Date (yyyy-MM-dd)
The date to run the integration for testing.
Enter the date in
YYYY-MM-DDformat.User prompt = Yes
Mandatory = No
CurrentRunDate(yyyy-MM-dd)
Text
Excluded Combined Paycode Threshold (h:mm)
Minimum threshold of hours for a day to be excluded.
Enter the number of hours in
h:mmformat.Default =
0:01User prompt = No
Mandatory = Yes
ExcludedCombinedPaycodeThreshold(h:mm)
Text
Hyperfind
Hyperfind or Location query for which the integration will run.
Default =
1(shown as blank) which indicates All Home and includes all active employees.User prompt = Yes
Mandatory = Yes
Note: Ad-hoc Hyperfinds are not supported. All Home does not include terminated and inactive employees even if they have totals during the period. To include these totals, configure a Hyperfind that includes terminated and inactive employees, and select that Hyperfind in this process property. The maximum number of employees in a Hyperfind is 3500. To process more employees, divide the population into smaller Hyperfinds to run sequentially.Hyperfind
Hyperfind
Maximum Seniority Levels
Specify the maximum levels of seniority to use.
User prompt = No
Mandatory = Yes
MaximumSeniorityLevels
Text
PersonNumbers
A comma-separated list of specific employees for whom the integration is run.
When no value is entered, the integration defaults to the Hyperfind parameter.
To process the integration for only a limited group of employees, enter the person numbers as defined in the source system, each separated by a comma (,) but not spaces.
User prompt = Yes
Mandatory = No
PersonNumber(s)
Text
Paycode Comment
The name of the comment for the paycode edit to indicate grants on the Timecard.
Default =
Adjustment by IntegrationUser prompt = No
Mandatory = No
PaycodeComment
Text
Paycode Comment Note
The note for a header to show the count of excluded days until last month; the integration provides the count.
Default =
Excluded Days until last month: <value of excluded days>User prompt = No
Mandatory = No
PaycodeCommentNote
Text
Paycode Name
The name of the paycode edit to indicate grants on the Timecard on the day when the accrual grant is given.
Default =
Accrual AdjustmentUser prompt = No
Mandatory = No
PaycodeName
Text
Reference Seniority Date
The person-record field that defines seniority.
Supported values include:
-
Hire Date(default) -
Seniority Date
User prompt = Yes
Mandatory = Yes
ReferenceSeniorityDate
Dropdown
Seniority Level Start
The first level of seniority. You can create as many seniority levels as grant amounts.
Default =
1To change the first level:
User prompt = No
Mandatory = Yes
SeniorityLevelStart
Text
Use Seniority on Integration Run Date
How seniority is verified.
Supported values include:
-
true(default) = Verify seniority on the date when the integration runs. -
false= The seniority level at the end of the month controls the grant.
User prompt = No
Mandatory = Yes
UseSeniorityOnIntegrationRunDate
Boolean
Worked Combined Paycode Threshold (h:mm)
Minimum threshold of hours for a day to be considered a worked day.
Enter the number of hours in
h:mmformat.Default =
0:01User prompt = No
WorkedCombinedPaycodeThreshold(h:mm)
Text
- Ensure that the generic data access profiles (GDAP) allow access by the people who need to run the installed integrations. SeeConfigure Access to Integrations.
Run and test the Monthly Vacation Grants integration
Run integrations to test that the configuration is set up correctly.
- Run the integration
- Select the integration:
- Select Main Menu
. - Click Tap Run an Integration
. - Select the MonthlyVacationGrants_iPack_v2 integration from the list. Click Tap Select.
- (Optional) Enter a unique Integration Run Name to make it easier to identify the run of the integration. Otherwise, the default name ends with a date and time stamp.
- Select Main Menu
- Set parameters as follows:
- Hyperfind: Select a hyperfind query of employees.
- (Optional) Person Number: To process data for only a limited group of employees, enter the person numbers, as defined in the source system, each separated by a comma (
,) but no spaces.Example: For 3 employees, enter:
13997,15556,20012 - Reference Seniority Date: Select one of the following fields to define seniority:
- Hire Date
- Seniority Date
-
Select the following:
- Run Integration: If this is the first time this integration is being run.
- Re-Run: If this integration has been run before, and the status is not In-Progress, you can run the integration again without entering the parameter values again. Click Tap Yes to continue, or No to not run the integration and to return to the parameter settings.
- Wait for the confirmation that the integration completed or failed. Close the panel.
- Click Tap Refresh
. - To see details, select the integration run. Select Run Summary.
- Select the integration:
- Check the results
Status indicators
-
In-Progress: The run of this integration has not yet completed. -
Completed: The integration ran successfully without errors. -
Scheduled: This integration is scheduled to run later or repeatedly. - (Grayed out) Scheduled but Deleted: This integration is scheduled to run, but the integration template has been deleted. When it runs, it will generate an error. To prevent this error, delete the scheduled integration run.
-
Completed with Errors: The integration ran successfully, but one or more records have errors. The integration run is treated as failed. If Abort on Failure is configured in an integration set, the integration set stops. -
Failed: The integration run has errors or could not run. - To troubleshoot and resolve errors, do the following:
Check the Run Summary for details.
- To troubleshoot all types of errors, or if the Run Summary shows a large number of errors, click tap Go to Additional Details (if available), or click tap the Source File to open and examine the input source file.
- (Only for import integrations) To troubleshoot and resubmit integrations that have transactional or data errors, click tap Go to Transaction Assistant.
To check the results in more detail, do the following:
- To see detailed results, click tap the tile for the integration run.
- Click Tap Run Summary to see the results of the integration run.
Example Run Summary details
Note: The available details vary by integration and configuration.- Integration Run Name: Name of this run of the integration.
- Process Name: Name of any integration set that includes this integration.
- Integration Name: Name of the installed integration.
- Integration Reference ID: Unique identifier for this integration run (to help in troubleshooting errors).
- User: The person or user account that ran the integration.
- Integration Type: Import, Export, or None
- Start Date: Date and time when the integration run started.
- End Date: Date and time when the integration run finished.
- Status: In-Progress, Completed, Completed with Errors, or Failed.
- Records Processed: Number of records that were processed.
- Records Created: Number of records that were created.
- Errors: Number of records that failed.
- Source Files, Output File, and Error Files: For file-based import integrations, use Manage SFTP to access the source and output files on the inbound (source) and outbound (destination) SFTP folders. See the Manage SFTP topic.
- Check the Timecard to make sure that the grants were applied correctly.
Note: You can schedule integrations and integration sets to run once later or at a recurring frequency. See the Schedule Integrations topic. -
APIs
|
API name |
Type |
Resource path |
Description |
|---|---|---|---|
|
POST |
/v1/commons/hyperfind/execute |
Executes a Hyperfind query by ID or qualifier and return the results. | |
|
POST |
v1/commons/persons/extensions/multi_read |
Returns multiple person records based on search criteria. | |
|
POST |
/v1/platform/integrations/update_status |
Updates integration execution details. | |
|
GET |
/v1/timekeeping/setup/accrual_profiles |
Returns a list of accrual profiles according to the user's access rights. | |
|
POST |
/v1/timekeeping/accruals/updates |
Updates the accrual balance. | |
|
POST |
/v1/timekeeping/timecard_metrics/multi_read |
Returns timecard data for a set of employees or locations. | |
|
GET |
/v1/platform/integration_executions |
Retrieves integration execution details. | |
|
POST |
/v1/timekeeping/timecard |
Updates a timecard for an employee as a manager. | |
|
POST |
/v1/timekeeping/pay_code_edits/multi_delete |
Deletes paycodes. | |
|
GET |
/v1/timekeeping/setup/employment_terms |
Returns one or more employment terms by object reference. |
Version history
|
Version |
Description |
|---|---|
|
1 |
Initial release. |
|
1.1 |
The Monthly Vacation Grants integration:
|
|
iPack_v2 |
The Monthly Vacation Grants integration delivery is now by way of an iPack. |