Leave Loading
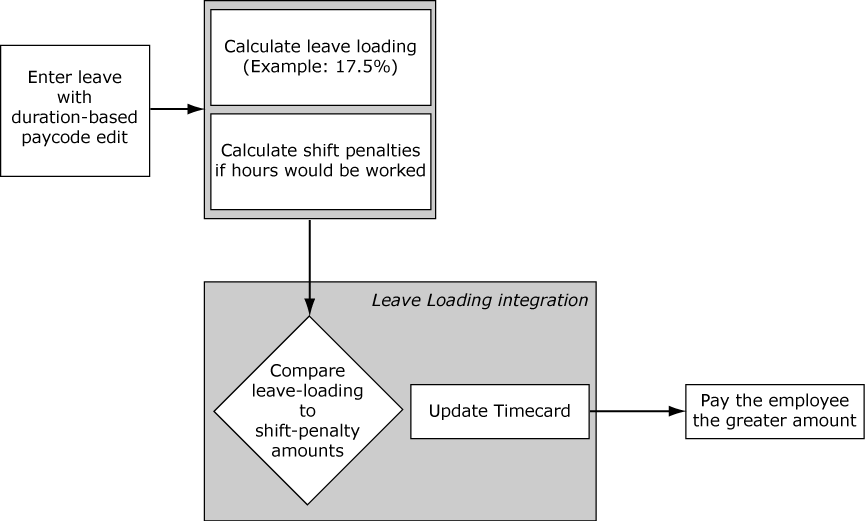
When taking annual leave, employees in Australia are entitled to an extra payment in addition to their basic salary. Typically, this extra payment is 17.5% and is called Leave Loading. The system calculates and this integration compares the extra amount with the payments that the employee would receive otherwise if they worked that period, including all projected shift or weekend premiums. The greater of the amounts becomes the extra payment.
Comparison models
Models to compare leave loading to penalties include the following:
- Pay Period— The system compares the amounts for all eligible leave for each pay period, one at a time.
- Leave Period— The system compares the amounts for an entire period of contiguous leave regardless of pay-period boundaries.
- Combined— This integration uses the Combined comparison model to determine which amount is greater — the leave-loading amount or the projected shift or weekend penalty amount — for each unique period of contiguous leave in a pay period. If a contiguous period of leave crosses a pay-period boundary, the comparison is done separately for each pay period that the leave spans.
Considerations and limitations
The Leave Loading extension:
Supports only duration-based paycodes; it does not support cascading paycodes.
Does not work with accrual balance cascades, even if you are using duration paycodes.
Must run in only the current or previous pay periods.
Expects that a base wage assignment exists for employees.
Should be run as part of pay period close, prior to signing off timecards.
Use case
Identify the leave periods
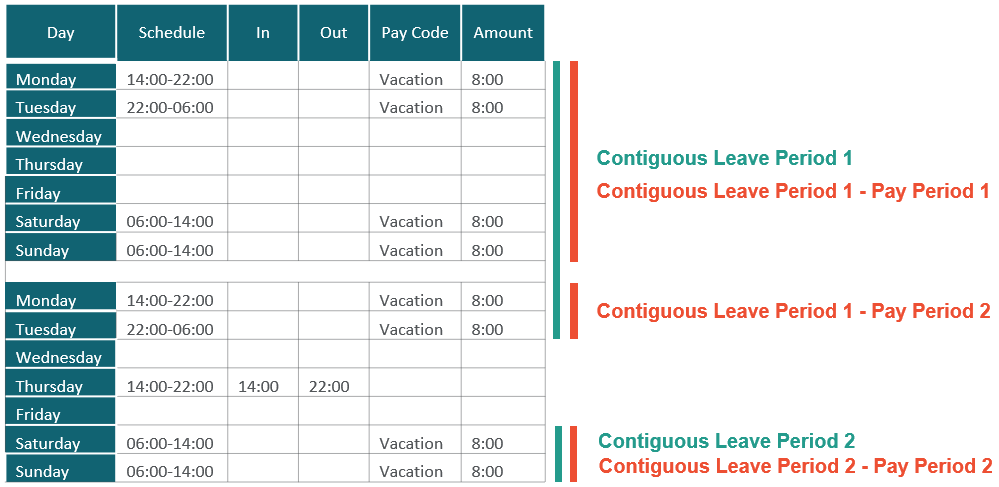
An employee takes 2 contiguous leave periods of vacation:
-
Contiguous Leave Period 1 crosses the weekly boundary between pay periods as follows:
Pay Period 1:
- Monday 14:00—22:00
- Tuesday 22:00—06:00
- Saturday 06:00—14:00
- Sunday 06:00—14:00
Pay Period 2:
- Monday 14:00—22:00
- Tuesday 22:00—06:00
The integration splits the leave period into Contiguous Leave Period 1 - Pay Period 1 and Contiguous Leave Period 1 - Pay Period 2 and uses the Combined model to compare the amounts separately for each pay period that the leave period spans.
- The employee works a shift on Pay Period 2> Thursday 14:00—22:00.
-
Contiguous Leave Period 2 does not cross any pay-period boundary and is within
Pay Period 2 as follows:
- Saturday 06:00—14:00
- Sunday 06:00—14:00
As a result, the integration identifies 3 leave-period pay-periods for which to determine which amounts are greater:
- Contiguous Leave Period 1 - Pay Period 1
- Contiguous Leave Period 1 - Pay Period 2
- Contiguous Leave Period 2 - Pay Period 2
Compare the earnings
The employee’s base wage is $10 and is eligible for the following shift penalties:
- Early and Late at 12.5%
- Nights at 15%
- Saturday at 50%
- Sunday at 75%
When taking leave, the employee earns an additional Leave Loading payment of 17.5% each hour unless the earnings if the employee worked are higher.
The integration compares the Leave Loading or Shift Penalties amounts separately for each contiguous period of leave during a pay period.
-
Contiguous Leave Period 1 - Pay Period 1:
- For leave loading:
4 X 8-hour shifts X $10 X 17.5% = $56 - For shift penalties:
Monday 14:00—22:00 (Afternoon penalty):
1 X 8-hour shift X $10 X 12.5% = $10Tuesday 22:00—06:00 (Night penalty):
1 X 8-hour shift X $10 X 15% = $12Saturday 06:00—14:00:
1 X 8-hour shift X $10 X 50% = $40Sunday 06:00—14:00
1 X 8-hour shift X $10 X 75% = $60Shift Penalties Total =
$122So, the employee receives the payment of $122 for shift penalties rather than $56 for leave loading.
- For leave loading:
-
Contiguous Leave Period 1 - Pay Period 2:
- For leave loading:
2 X 8-hour shifts X $10 X 17.5% = $28 - For shift penalties:
Monday 14:00—22:00 (Afternoon penalty):
1 X 8-hour shift X $10 X 12.5% = $10Tuesday 22:00—06:00 (Night penalty):
1 X 8-hour shift X $10 X 15% = $12Shift Penalties Total =
$22So, the employee receives the payment of $28 for leave loading rather than $22 for shift penalties.
- For leave loading:
-
Contiguous Leave Period 2 - Pay Period 2:
- For leave loading:
2 X 8-hour shifts X $10 X 17.5% = $28 - For shift penalties:
Saturday 06:00—14:00:
1 X 8-hour shift X $10 X 50% = $40Sunday 06:00—14:00
1 X 8-hour shift X $10 X 75% = $60Shift Penalties Total =
$100So, the employee receives the payment of $100 for shift penalties rather than $28 for leave loading.
- For leave loading:
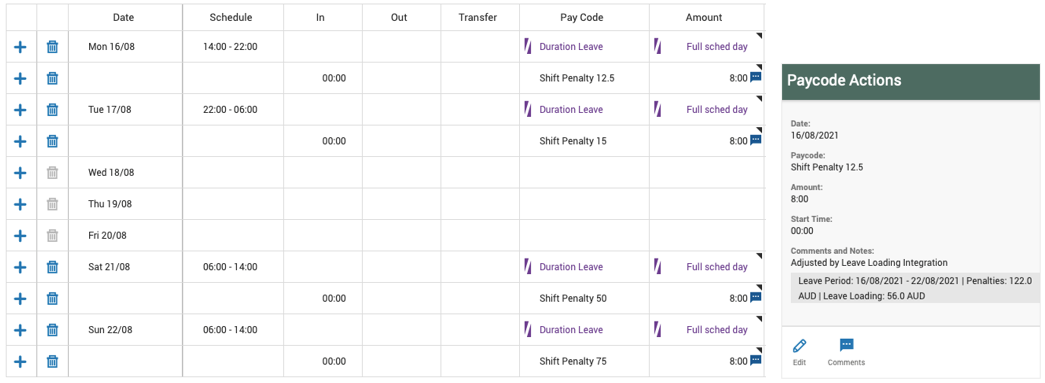
In the Timecard:
After the integration runs, the Timecard shows the leave-loading or shift-penalty paycodes.
Hover the cursor over the cell to see the comment and note for details about the leave period that was evaluated, and the penalties and leave-loading amounts.
Boomi extension setup
- Get the URL, User, and Password for the APIGatewayServer.
- Install and attach the iPack.
Note: For more information, see the Deploy Integration Packs to your Atom topic.
-
Open the Integration Template Designer: Select .Note: If prompted, enter your Username and Password. Click Tap Log in.
-
Make sure that the Account is correct. If not, select the right account.
- Select the Deploy tab > Integration Packs.
- From the list in the left column, search for and select the Pro WFM Leave Loading Extension integration. Note: If the integration does not display, select Browse Integration Packs to search for and select the iPack.
-
Click Tap Install.
-
From Unattached Environments, select the environment in which to deploy the integration process for the selected integration. Click Tap the double-left arrows button .
-
- Configure the Leave Loading integration settings
- Select the environment
- Select the Manage tab > Atom Management.
- Select your environment.
- Select environment extensions
- In Administration, click tap Environment Extensions.
- In Process Filter, click tap the magnifying glass . It can take several seconds before the button becomes active.
-
Scroll to and select the integration pack: .
- Select the environment
- Configure connection settings
Caution: If you select Use Default for the connection settings and process properties, ensure that Value is blank. If Value is not blank, that value overrides the default value whether or not Use Default is selected or cleared. Example: If the default value is abc, but Value shows xyz, the integration uses xyz regardless of the setting of Use Default.
- Select Connection Settings.
-
From the Connection dropdown list, select and configure the following:
Connection Settings
Setting
Required
Actions
LeaveLoading_iPack_v2_APIGatewayServer
Required
To change the default API gateway server:
- Clear Use Default.
- Enter the URL to the server.
Example:
<tenantURL>/api
LeaveLoading_iPack_v2_PayrollPaycode_CRT
Required
Enable Override.
- Configure process properties
- Select Process Properties. Caution: Do not edit the default values of the AuthenticationProperties. By default, cookies are enabled and set the values for authentication properties.
-
Select LeaveLoading_iPack_v2_CRTConfig to set process properties that must be configured before the integration can run. This main process starts the integration process and handles errors.
Process properties
Process property name
Column header value
_LeaveLoading_iPack_v2_PayrollPaycode_CRT
Internal Paycode,Payroll Export Paycode,Paycode Type
- Select Process Properties.
Configure the Leave Loading integration
After the integration is deployed, complete the following configurations before you utilize this integration.
Application setup
- Configure Access to Integrations.
- Configure the following:
-
Hyperfind: Configure a Hyperfind that identifies employees who work in locations that allow leave loading. See the Hyperfind Queries topic.
-
Paycodes: Configure paycodes that support the Leave Loading process. See the Paycode definition topic.
Create each of the following paycodes:
- Shift penalties are actual penalties (also known as premiums) that are awarded to employees when they work shifts. Examples: 12.5% for early or late shifts, 15% for night shifts, 50% for Saturday shifts, 75% for Sunday shifts.
- Leave-loading tracking paycodes: Create the following paycode that you will add (later in the Paycode Distributions step) to the paycode distribution to track leave loading:
- Leave Load—Track—PenaltyZone to track zones that have penalties. Note: This paycode is intermediate and is hidden, but configure it as part of the paycode distribution and pair it with a zone. Employees are not paid based on this paycode.
- Leave Load—Track—PenaltyZone to track zones that have penalties.
-
Leave-loading comparison paycodes: Map each shift penalty from the paycode distribution to an equivalent leave-loading comparison paycode, and set the applicable multiplier as follows:
- Leave Load—Compare—Penalty 12.5: Multiplier = 0.125.
- Leave Load—Compare—Penalty 15: Multiplier = 0.150.
- Leave Load—Compare—Penalty 50: Multiplier = 0.50.
- Leave Load—Compare—Penalty 75: Multiplier = 0.75.
- Leave Load—Compare—Load 17.5: Multiplier = 0.175.
- Payroll paycodes that export the leave loading or shift penalties premiums to payroll.
- Leave Duration paycodes add the annual leave. The paycode distribution passes each intermediate paycode through the configured replacement paycode. You can map the tracking paycode for non-penalty zones directly with a leave-loading paycode. The penalty zones are replaced by the comparing paycodes, one with the flat rate and the other with the applicable penalty rate. The comparing paycodes use a multiplier to calculate the monetary value.
Example Leave Duration paycode mappings
Intermediate paycode
Replacement paycode
Regular
Vacation hours
Shift Penalty 12.5
Leave Load—Compare—Penalty 12.5
Shift Penalty 15
Leave Load—Compare—Penalty 15
Shift Penalty 50
Leave Load—Compare—Penalty 50
Shift Penalty 75
Leave Load—Compare—Penalty 75
Leave Load—Track—PenaltyZone
Leave Load—Compare—Load 17.5
- Combined paycodes: Create combined paycodes that support the Leave Loading process.
See the Combined Paycodes topic.
- Leave Loading Interrupt Hours is a combined paycode that holds all hours-based paycodes that can break a contiguous leave period. This paycode is used only for calculation and can be hidden from Totals. Example: This paycode holds Regular or Sickness hours.
- Leave Loading Interrupt Days is a combined paycode that holds all day-based paycodes that can break a contiguous leave period. This paycode is used only for calculation and can be hidden from Totals. Example: This paycode holds Training or Child Care days.
- Leave Loading — Penalties is a combined paycode that holds all internal comparison paycodes to consider for the shift penalties. This paycode is used only for calculation and can be hidden from Totals.
- Leave Loading — Leave Load paycodes are combined paycodes that hold all internal comparison paycodes to consider for leave loading. This paycode is used only for calculation and can be hidden from Totals. Create the following:
- Leave Loading — Leave Load 12.5
- Leave Loading — Leave Load 15
- Leave Loading — Leave Load 50
- Leave Loading — Leave Load 75
- Leave Loading — Leave Load 17.5
-
Paycode distributions: Create paycode distributions that support the Leave Loading process. See thePaycode Distributions topic. Add the following paycodes to the distribution:
- Leave Load—Track—NoPenaltyZone to the zones that do not have penalties.
Examples:
Default:
Regular,Leave Load—Track06—14: Shift Penalty 12.5, Regular, Leave Load—Track—PenaltyZone
14—22: Shift Penalty 12.5, Regular, Leave Load—Track—PenaltyZone
22—06: Shift Penalty 15, Regular, Leave Load—Track—PenaltyZone
Saturday: Shift Penalty 50, Regular, Leave Load—Track—PenaltyZone
Sunday: Shift Penalty 75, Regular, Leave Load—Track—PenaltyZone
- Leave Load—Track—NoPenaltyZone to the zones that do not have penalties.
-
Comment: Configure a comment to add to the Timecard to identify the paycode edits for the payroll system. Select the Paycodes category during configuration. See the Comments topic.
Example:Adjusted by Leave Loading Integration.
-
Cross-reference tables
Cross-reference tables (CRT) are the look-up tables that the integrations use to translate parameter values. One or more data values from the source system can be used to assign one or more parameters in the destination system.
To make a cross-reference table available for integration processes, populate the table with data.
- If more than one row matches a reference value, the first match is the output value.
- If no match is found, the output value can be null, or the integration can produce errors.
LeaveLoading_iPack_v2_PayrollPaycode_CRT: Maps the internal comparison paycodes to the equivalent payroll export codes for the Timecard.
|
Column name |
Description |
|---|---|
|
Internal Paycode |
The paycodes that are used to compare leave loading and shift penalties. |
|
Payroll Export Paycode |
The paycodes that are used for payroll export. |
|
Paycode Type |
Leave Loading or Penalty. Used to facilitate fast lookup. |
|
Internal Paycode |
Payroll Export Paycode |
Paycode Type |
|---|---|---|
|
Leave Load—Compare—Load 17.5 |
Leave Loading 17.5 |
Leave Loading |
|
Leave Load—Compare—Penalty 12.5 |
Shift Penalty 12.5 |
Penalty |
|
Leave Load—Compare—Penalty 15 |
Shift Penalty 15 |
Penalty |
|
Leave Load—Compare—Penalty 50 |
Shift Penalty 50 |
Penalty |
|
Leave Load—Compare—Penalty 75 |
Shift Penalty 75 |
Penalty |
Install the Leave Loading integration
After the integrations are deployed and the connection settings and process properties are configured, install the integrations to make them available for running or scheduling.
- An integration template is the configured integration that you deploy to an Atom and then install to make available for running or scheduling.
- An installed integration is a single instance of an integration that is based on an integration template. When you install an integration, you can define parameters or set parameters to be defined when the integration is run.
- Select .
- Click Tap Create
. - In Integration Name, enter a unique name, such as
LeaveLoading_iPack_v2. - (Optional) Enter a Description.
Note: Do not select API Integration.
- In File Access, select None to not select a connection.
- (Optional) If the person who runs the integration does not have full access to integrations, select Execute Integration with System Account. This allows the integration access to all APIs in the FAP, and the relevant permissions and data, regardless of the FAP and GDAP of the person who runs the integration.
-
(Optional) Select Re-Run to allow repeated runs of the integration with the same parameter values as the previous run.
-
Email Notifications
(Optional)
- Select Yes to send email and control center notifications for integration runs.
- Enter the email addresses of the recipients for the following types of run status. For multiple recipients, separate the addresses by a comma, but no spaces:
In Progress — The integration run started and has not finished.
Completed — The integration ran successfully without errors.
Failed — The integration ran successfully, but one or more records have errors. The integration run is treated as failed. If Abort on Failure is configured in an integration set, the integration set stops.
Completed with Errors — The integration run has errors or could not run.
- In Skip Configuration, select None(default) to allow multiple integrations to run at the same time or with the same data without restrictions.
Note: Do not select Allow Minute Interval.
- Integration template and parameters
- In Integration Template, select Leave Loading_iPack_v2.
- Click Tap Assign
. - In Integration Parameters, you can override default settings. Click Tap Create.
- Complete the configuration for each parameter value.
-
Click Tap Save.
Repeat this step for each integration parameter that supports the Leave Loading process.
Integration Parameters
Parameter name / Template Parameter
Description / User prompt / Mandatory
Template parameter
Parameter type
Hyperfind
The default Hyperfind query that contains the employees for whom the integration is run.
Default =
All HomeUser prompt = Yes
Mandatory = Yes
Note: Ad-hoc Hyperfinds are not supported. All Home does not include terminated and inactive employees even if they have totals during the period. To include these totals, configure a Hyperfind that includes terminated and inactive employees, and select that Hyperfind in this process property. The maximum number of employees in a Hyperfind is 3500. To process more employees, divide the population into smaller Hyperfinds to run sequentially.HyperfindAndLocation
Hyperfind
Individual Employee ID
A comma-separated list of specific employees for whom the integration is run.
When no value is entered, the integration defaults to the Hyperfind parameter.
To process the integration for only a limited group of employees, enter the person numbers as defined in the source system, each separated by a comma (,) but not spaces.
User prompt = Yes
Mandatory = No
EmployeeIDs
Text
Interrupting Paycode Day
The combined paycode that holds all day-based paycodes that can break a contiguous leave period.
Default =
Leave Loading—Interrupt Days.User prompt = No
Mandatory = Yes
InterruptingPaycodeDay
Text
Interrupting Paycode Day Threshold
The minimum value in days for a paycode to be considered as interrupting.
Default =
0.1days.User prompt = No
Mandatory = No
InterruptingPaycodeDayThreshold
Text
Interrupting Paycode Hours
The combined paycode that holds all hours-based paycodes that can break a contiguous leave period.
Default =
Leave Loading—Interrupt Hours.User prompt = No
Mandatory = Yes
InterruptingPaycodeHours
Text
Interrupting Paycode Hours Threshold
The minimum value in hours for a paycode to be considered as interrupting.
Default =
00:01hours.User prompt = No
Mandatory = No
InterruptingPaycodeHoursThreshold
Text
Leave Loading Paycode
The combined paycode that holds all paycodes that are considered for leave loading.
Default =
Leave Loading—Leave Load 17.5.User prompt = No
Mandatory = Yes
LeaveLoadingPaycode
Text
Penalty Paycode
The combined paycode that holds all paycodes that are considered for shift penalties.
Default =
Leave Loading—Penalties.User prompt = No
Mandatory = Yes
PenaltyPaycode
Text
Process Signed-Off Period
Whether to process data for signed-off periods.
Supported values:
true: Process data for signed-off periods.false(default): Do not process data for signed-off periods.User prompt = No
Mandatory = Yes
ProcessSignedOffPeriod
Boolean
Time Period
The date range or symbolic time period for which the integration retrieves data.
Supported values include:
0= Previous pay period (default)1= Current pay period2= Next pay period3= Previous schedule period4= Current schedule period5= Next schedule period6= Week to date7= Last week8= Yesterday10= Range of relative dates11= Specific date12= Relative specific date13= TodayUser prompt = Yes
Mandatory = No
Note: If Time Period is not specified, the integration runs from the last signed-off day to the run date of the integration.TimePeriod
Time period
Update Comment
The comment that is added to the adjustment paycode in the timecard.
Default =
Adjusted by Leave Loading Integration.User prompt = No
Mandatory = Yes
UpdateComment
Text
Comment Note
The note for the comment that identifies the paycode edits.
Default value=
Leave Period: #StartDate# - #EndDate# | Penalties: #Penalty# | Leave Loading: #LeaveLoading#.These values are variables and are completed by the integration as follows:
-
#StartDate#: Start date of the evaluated leave period -
#EndDate#: End date of the evaluated leave period -
#Penalty#: Penalty amount used for the comparison -
#LeaveLoading#: Leave-loading amount used for the comparison
User prompt = No
Mandatory = No
CommentNote
Text
PayCodeLeave Contains a comma-separated list of leave paycodes that are assigned on Multiple Assignment dates. User prompt = No
Mandatory = No
PayCodeLeave -
- Make sure that the generic data access profiles (GDAP) allow access by the people who need to run the installed integrations.
Run and test the Leave Loading integration
Run integrations to test that the configuration is set up correctly.
- Run the integration
- Select the integration:
- Select Main Menu
. - Click Tap Run an Integration
. - Select the LeaveLoading_iPack_v2 integration from the list. Click Tap Select.
- (Optional) Enter a unique Integration Run Name to make it easier to identify the run of the integration. Otherwise, the default name ends with a date and time stamp.
- Select Main Menu
- Set parameters as follows:
- Hyperfind: Select a hyperfind query of employees.
- Individual Employee ID: To process data for only a limited group of employees, enter the person numbers, as defined in the source system, each separated by a comma (
,) but no spaces.For 3 employees:
13997,15556,20012 - Time Period: Select a time period.
-
Select the following:
- Run Integration: If this is the first time this integration is being run.
- Re-Run: If this integration has been run before, and the status is not In-Progress, you can run the integration again without entering the parameter values again. Click Tap Yes to continue, or No to not run the integration and to return to the parameter settings.
- Wait for the confirmation that the integration completed or failed. Close the panel.
- Click Tap Refresh
. - To see details, select the integration run. Select Run Summary.
- Select the integration:
- Check the results
Status indicators
-
In-Progress: The run of this integration has not yet completed. -
Completed: The integration ran successfully without errors. -
Scheduled: This integration is scheduled to run later or repeatedly. - (Grayed out) Scheduled but Deleted: This integration is scheduled to run, but the integration template has been deleted. When it runs, it will generate an error. To prevent this error, delete the scheduled integration run.
-
Completed with Errors: The integration ran successfully, but one or more records have errors. The integration run is treated as failed. If Abort on Failure is configured in an integration set, the integration set stops. -
Failed: The integration run has errors or could not run. - To troubleshoot and resolve errors, do the following:
Check the Run Summary for details.
- To troubleshoot all types of errors, or if the Run Summary shows a large number of errors, click tap Go to Additional Details (if available), or click tap the Source File to open and examine the input source file.
- (Only for import integrations) To troubleshoot and resubmit integrations that have transactional or data errors, click tap Go to Transaction Assistant.
To check the results in more detail, do the following:
- To see detailed results, click tap the tile for the integration run.
- Click Tap Run Summary to see the results of the integration run.
Example Run Summary details
Note: The available details vary by integration and configuration.- Integration Run Name: Name of this run of the integration.
- Process Name: Name of any integration set that includes this integration.
- Integration Name: Name of the installed integration.
- Integration Reference ID: Unique identifier for this integration run (to help in troubleshooting errors).
- User: The person or user account that ran the integration.
- Integration Type: Import, Export, or None
- Start Date: Date and time when the integration run started.
- End Date: Date and time when the integration run finished.
- Status: In-Progress, Completed, Completed with Errors, or Failed.
- Records Processed: Number of records that were processed.
- Records Created: Number of records that were created.
- Errors: Number of records that failed.
- Source Files, Output File, and Error Files: For file-based import integrations, use Manage SFTP to access the source and output files on the inbound (source) and outbound (destination) SFTP folders. See the Manage SFTP topic.
- Log in to the destination system and make sure that the data has been correctly updated.
Note: You can schedule integrations and integration sets to run once later or at a recurring frequency. See the Schedule Integrations topic. -
Schedule the Leave Loading integration
You can configure integrations to run on-schedule at a recurring frequency. Runs of this integration must be scheduled because this integration does not make adjustments in real time.
- Click Tap .
- Click Tap Schedule Processes
. Note: If you don't see this button, click tap Run Processes to toggle the labels. - Click Tap Schedule an Integration
. - Select the LeaveLoading_iPack_v2 integration.
- (Optional) Enter a unique Integration Run Name to make it easier to identify the run of the integration. Otherwise, you use the default name which ends with a date and time stamp.
- Select or enter any parameters or files that are required.
-
In Schedule, select Recurring Scheduled Run to repeat the run on a regular schedule.
Caution: Although integrations run in parallel and independently, if you schedule the same integration or integration set to run repeatedly at short intervals, errors can result. Also frequent runs increase the traffic load on the network. A best practice is to space runs at least 15 minutes apart. Example: If two integrations access and update a file, the first integration must finish the update before the second integration starts to update the same file. If the first integration moves or erases that file before the second can access it, the second integration fails.- Click Tap Recurrence
. - From Repeats, select the frequency of runs:
By Month
- Select the months.
- Select the day of the month.
By Day— Select the number of days between runs.
By Hour— Select the number of hours between runs.
By Week
- Select the number of weeks between runs.
- Select the day of the week.
By Minute— Select 5-minute intervals.
- Select the Start Date.
- Enter the Start Time.
- Select the End Date. If you select Forever or leave the End Date blank, the schedule recurs indefinitely.
- Click Tap Apply.
- Click Tap Schedule Integration Request.
- Close the panel.
- Close the panel.
- Click Tap Recurrence
APIs
|
API name |
Type |
Resource path |
Description |
|---|---|---|---|
|
GET |
/v1/commons/comments |
Returns a filtered list of comments. | |
|
POST |
/v1/commons/hyperfind/execute |
Executes a Hyperfind query by ID or qualifier, and then returns the result. | |
|
POST |
/v1/commons/persons/extensions/multi_read |
Returns multiple person records based on search criteria. | |
|
GET |
/v1/commons/symbolicperiod |
Retrieves a locale date span or symbolic period matching the provided data. | |
|
POST |
/v1/platform/integration_executions/ |
Retrieves a list of all integration runs including completed, in-progress, scheduled, and failed integration runs. | |
|
POST |
/v1/platform/integrations/update_status |
Updates and returns the callback instance against the provided integration execution details. | |
|
GET |
v1/commons/pay_period |
Returns a pay period time span. | |
|
POST |
/v1/timekeeping/timecard_metrics/multi_read |
Returns timecard data for a set of employees. | |
|
POST |
/v1/commons/data/multi_read |
Returns aggregated data by executing an ad hoc query. | |
|
POST |
/v1/timekeeping/enable_edits/import |
Returns a list of employees with enabled edits. | |
|
POST |
/v1/timekeeping/pay_code_edits/import |
Imports paycode edits in bulk. | |
|
POST |
/v1/timekeeping/pay_code_edits/multi_delete |
Performs a bulk delete of paycode edits for multiple employees using a list of paycode edit IDs. | |
|
POST |
/v1/timekeeping/timecard |
Updates a timecard for an employee as a manager. | |
|
POST |
/v1/timekeeping/timecard/multi_read |
Returns a list of timecards based on the employees or Hyperfind details provided. | |
|
GET |
/v1/commons/user_preferences/locale_policy?tenantDefault=true |
Returns user preferences for the current user or tenant. | |
|
POST |
/v1/commons/locale_policies/multi_read |
Retrieves the locale information. |
Version history
|
Version |
Description |
|---|---|
|
1 |
Initial release. |
|
1.1 |
The paycode edit was rounded to an integer value when added in the signed-off period. |
|
1.2 |
When the Leave Loading integration completed with partial success, the status icon did not display in red to indicate that a review was needed. |
|
iPack_v2 |
The Leave Loading integration delivery is now by way of an iPack. |
|
iPack_v2 (enhancement) |
When annual leave already existed in the employee timecard, the Leave Loading integration did not apply either the Leave Loading or Penalty Rate amount for subsequent annual leave requests. |
| The Leave Loading integration now supports Multiple Assignments. | |
| The Leave Loading extension incorrectly applied duplicate paycodes in the Timecard on days with split shifts. | |
| The hours comparison between the combined Leave Loading paycode and the sum of individual Leave Loading paycodes failed due to a decimal precision mismatch and Leave Loading integration produced the error message "Penalty paycode is not configured in CRT." This issue has been resolved by applying rounding to five decimal places for both individual paycode amounts and combined paycode totals. |