Resubmit Failed Integrations
How to resubmit failed integrations to the Transaction Assistant; Description of the Transaction Assistant.
Integration Hub verifies the validity of data and indicates integration runs that contain errors. Use Transaction Assistant to resubmit integrations that failed because of minor errors.
What is the Transaction Assistant?
Transaction Assistant shows transaction errors in integrations so that, if circumstances are appropriate, you can resubmit the integration as follows:
- Use Transaction Assistant to resolve transaction errors in the short term when there are only a few data errors, or to meet an immediate deadline when you don't have time to correct the original integrations or data.
Regardless, you must correct the errors before the next integration run to prevent them from occurring again. Identify and correct the source of the problem in the integration or the data source.
Example: A punch import fails if the badge number is missing. Use the Transaction Assistant to correct the badge number and submit the failed punch import again. Then correct the badge number in the source integration, or this error will occur again.
- However in some cases, source corrections are not necessary.
Example: A person import fails if labor category information has not been entered in the database. Use the Transaction Assistant to submit the failed person imports again after you enter the labor category information. In this case, you do not need to correct the source because the error was caused by missing information, and that missing information is now available.
- Transaction Assistant cannot resolve integration errors; troubleshoot from Integration Hub and the Integration Designer.
All interactions use APIs. While an API runs, failures can occur as follows:
- If the syntax in the request is wrong or if the connection fails, Integration Hub shows an error message. The request stops and the failed integration is not reported. You must correct these errors before you can run the request again.
- If the syntax is correct, Integration Hub creates a record for each item in the request.
Example: Integration Hub creates a record for each employee in an import of people records, or for each labor category that is imported. The result can be hundreds of records. Integration Hub then validates each record. If any record fails validation, the database is not updated. Instead, Transaction Assistant lists the integration as failed.
Resubmit integrations from the Transaction Assistant
Do one of the following:
- Select
Main Menu
. -
Click Tap
Notifications
. The number on the button indicates the number of active notifications. In Categories, select Integrations.
- Select
Main Menu
- Select an integration run.
- Check the Run Summary for details.
- Click Tap Go to Transaction Assistant.
- Check the details in the Transaction Assistant:Note: The initial page of the Transaction Assistant can show up to 200 records of errors; scroll to show more records. The Transaction Assistant can load a maximum of 50,000 records.
Above the table are the following counts of records:
- Total
- Selected
- Displayed: The number of records that have been loaded; scroll to show more.
The table shows the following:
- Error Number: The system number of the error
- Description: A brief error message; hover the cursor over a description to display more information; includes the name of the API tag that has the error. If the same ID has multiple errors, the pop-up shows all of the error messages.
-
Error Date/Time: Date and time of the first error; an error can trigger later errors. The date and time remain the same regardless of the number of times the integration is submitted.
Example: If a process to import a new person ID fails, all other import processes for that person ID also fail. This can include imports of punches, paycode edits, or schedules.
-
ID: For a failed integration, the specific value varies according to the information that Integration Hub sends to the Transaction Assistant. Examples: person ID, labor category, shift code, or any value that is in the detailed error description. Example: If a failure occurs in a punch import process, ID displays the Person ID for the punch that failed.
Note: ID does not show the property name, such as person ID, only the value of the property. Hover the cursor over the ID to see the property name.
If you sort by ID, you sort first by the property that failed, then by the value of that property. Hover the cursor over the ID column to see the name of the property that failed. Example: For a person import process where the Transaction type is People, failures occurred for a number of employees and all failed integrations are sorted together. The integrations are sorted first according to the value of the failed item: Person ID. Then each failure for the employee is sorted.
Scan the list for related errors. Example: Search all errors that occurred for employee 123456 in the people integration of the person import process.
- Transaction Type: The import category of the integration. Examples: Data Import, punches, labor categories
-
Transaction Start Date/Time: Date and time when the integration started
Transaction Start Date/Time is the same as Error Date/Time unless Integration Hub uses the transaction date and time. Example: Transaction Start Date/Time can be the time when the import process starts, and Error Date/Time can be the time of the error.
The date and time in the Transaction Assistant can be different from the date and time in the import reports. The Transaction Assistant displays Error Date/Time and Transaction Start Date/Time according to the time the errors occurred or the time the integration started. The Import Statistics and Import Errors reports record the date and time when the error information is saved.
- API Endpoint: The API endpoint that was called and which produced the transactional error.
- To see more information about an error, click tap the Description. The slider opens to show detailed information.
- (Optional)
Change the time period. Click Tap Select Timeframe
or the arrows or . - (Optional)
Filter the list of records as follows:
-
Click Tap
Refine
to sort or filter the list of records. - In Refine, select the dropdown for the corresponding column header.
- Select or enter the operator and value.
Example:
- Select API Endpoint.
- Select Custom to match the text that you enter.
- Enter
punch.
Note: This field is for searches for text strings, and regular expressions are not supported.
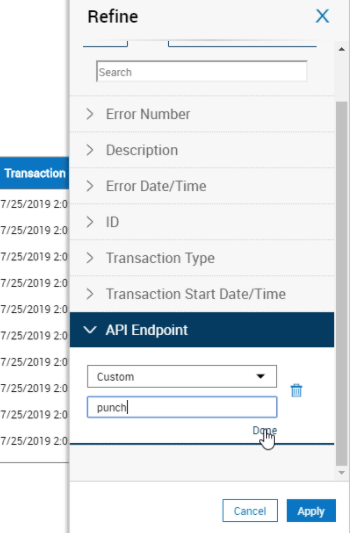
- Click Tap Apply.
- Repeat with more operators and values to filter the records further.
Example:
Filter for punch errors for an employee on a specific date as follows:
- Select API Endpoint. Select Custom. Enter punch to show only errors that are related to punch integrations.
- Select ID. Enter the person ID of an employee.
- Select Error Date/Time. Select the date.
-
Click Tap
Refine
- (Optional) To download all error records for an integration run to a comma-separated values (CSV) file for troubleshooting, see Transaction Assistant Downloads.
- (Optional) To copy the error records to another application, such as a text file or spreadsheet, do the following:
- Select an error record, or page down to load all records and click tap Select Max.
- Hold Shift while you click tap the last error record that you want to copy.
- Press Ctrl+ C.
- Paste the records into the other application.
-
Resubmit an integration as follows:
- Correct parameters if you can.
- Select the Description of the error.
- Search for and correct parameters.
- Click Tap Resubmit.
- If the parameters of the integration are correct, but another condition caused it to fail, submit the integration process again without making any changes or edits.
Example: A business structure import failed because the labor category had not been entered. Once you enter the labor categories, you can submit the business structure import again without making changes to the integration.
- Select any field of the error except
Description.
To select multiple errors, press and hold Ctrl while you select errors. You can select up to 200 errors at a time to resubmit or delete.
To select up to 200 of the errors that are loaded, click tap Select Max
. You cannot select more than 200 records, and Select Max selects only the first 200 records in the Transaction Assistant. To filter the error records, click tap Refine. - Click Tap Resubmit.
- To resubmit more errors, scroll to load more errors and repeat these steps.
- Select any field of the error except
Description.
- Correct parameters if you can.
- If you see a Warning, select Continue Processing All Selected Transactions in the Event of a Failed Record. Click Tap Yes to confirm.
- Click Tap OK to close the confirmation or error message.
- Close the panel.
-
Click Tap
Refresh
. - When you resubmit an integration run, it becomes a new integration and the previous integration run is deleted from the list. If the integration fails again, the Transaction Assistant lists the resubmitted integration run.
- There is no limit to how often you can submit an integration.