Multiple Employments
This topic provides managers and system administrators with an overview of multiple employments functionality and instructions for configuring linked employments.
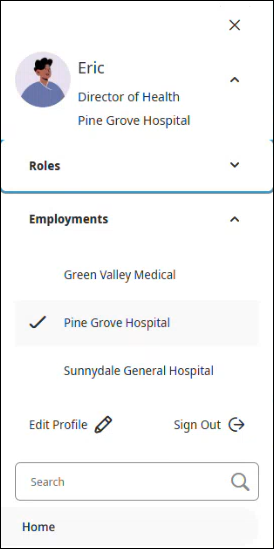
Multiple employments allow employees to access more than one employment within the same organization using a single login. After logging in, employees can access and switch between all linked employments. Each employment has its own name, making it easy to identify. The active employment is listed under the employee's name on the welcome screen.

Employees can switch employments from the main menu.
Impact for managers:
Managers can access only the employments within their assigned employee groups.
Timecards, schedules, and leave requests are segmented by employment.
Pay rules and payroll processing are handled independently per employment.
Impact for employees:
Timecards, totals, schedules, accruals, time off, and leave are tracked separately for each employment.
Employees receive separate paychecks and tax statements.
If badge punching is used, employees can have a different badge per employment.
Multiple employments vs. Multiple assignments
This section provides a brief comparison of the multiple employments and multiple assignments features and when to use each.
Use multiple employments when:
The employee works across different business entities
Separate paychecks are required
Separate payroll cycles are required
Distinct tax or pay rules apply
Use multiple assignments when:
The employee has multiple roles
All roles exist within the same business entity
Payroll and tax processing remain unified
Configure multiple employments
This section provides information on how to configure multiple employments.
- Create one person record for each employment. The record that contains the single sign-on login information is the primary employment and appears first when the employee logs in. Note: If the primary employment is terminated, login credentials must be established on another active employment record to maintain access.
- Complete all required fields for each person record.
The following fields must be unique for each record:
ID
Username
Badge Number
You may duplicate other content fields across linked records.
- Append a unique identifier to the ID, Username, and Badge Number fields.
It is recommended to use an identifier that relates to the specific employment. For example, Eliza's ID is 12345 and her Username is ElizaAdams. She works for a healthcare corporation that has unique business entities. Eliza works at 3 of their hospitals. Her ID, Username, and Badge Number values for each of her person records may look something like this:
ID: 12345-Hosp1
Username: ElizaAdams-Hosp1
Badge Number: 67891
ID: 12345-Hosp2
Username: ElizaAdams-Hosp2
Badge Number: 67892
ID: 12345-Hosp3
Username: ElizaAdams-Hosp3
Badge Number: 67893
- Enter the Employment Name. The Employment Name displays when employees log in and when they switch employments from the main menu.Note: If an employment name is not entered, the system defaults to the ID.
- Assign the Employment Link. Use the Update Multiple Persons API or the Create or Update Persons API to assign the employment link.
The Employment Link:
Must be identical across all linked records
Must be alphanumeric (maximum 50 characters)
Recommended value: base employee ID (without appended values)
Note: The Employment Link cannot be edited in the UI. It must be assigned and modified via API to prevent accidental linking of person records.
Reporting for multiple employments
The following columns are available in the Employee Details entity:
Employment Link
Employment Name