Creating a Bank Account
This menu option allows you to configure Company Bank Accounts that will be drawn from for any part of the Payroll Process such as Direct Deposits, live Checks, Invoices, Taxes, or Vendor Payments.

Bank Account Page
To create a new bank account, navigate to Administration > HCM Setup >Settings > Payroll Setup > Bank Accounts. Select the Add New Bank Account button.
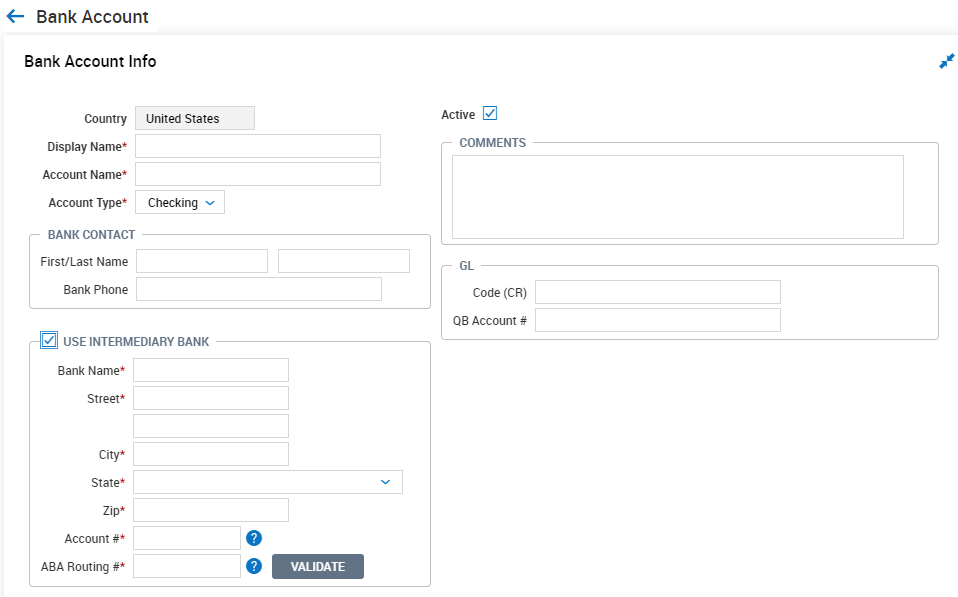
On the Bank Account page, complete the following sections and fields:
Country: The system defaults to the correct routing type based on the Default Country of the company, pre-populated here, that is defined under Administration > HCM Setup >Settings > Global Setup > Company Setup, in the Company Configuration widget.
Display Name: Enter any name that you choose for this bank account. The name entered will be the name that displays in drop-downs in the system (Required).
Account Name: Enter a name for this bank account (Required).
Account Type: Select one of the available options (Required):
Bank Contact: Enter the name and phone number for your primary bank contact.
Active: Uncheck this box if this bank account becomes inactive.
Comments: Enter any notes or comments that pertain to this account.
GL: Enter the general ledger data such as the (GL) Code segment associated with this bank account in this box. In addition, if Secondary GL data is utilized, those general ledger segments are also available.
Use Intermediary Bank: This option enables you to specify a bank that will be used to forward funds, if necessary. You can specify the intermediary bank’s name, address, the account number, and ABA routing number.
Check Info
The Check Info section is where you enter the information that you want to appear on your check.
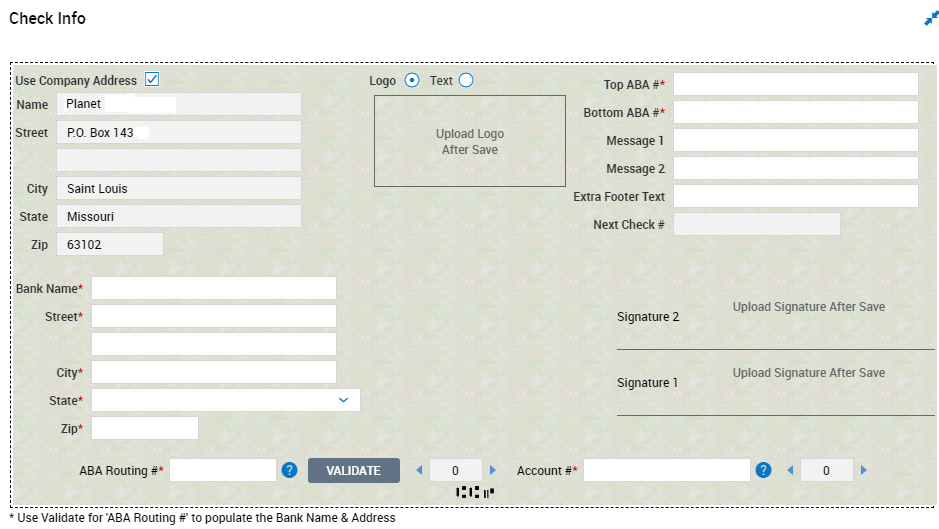
Complete the following sections and fields:
Use Company Address: Check this box if the address from the company information section should be used on the check. If checked, the box grays out and the default company name and address information are populated. If you do not want the default company name and address to be printed on the check, do not check the box. Instead, fill in the information that you want to print on the check.
Bank Name and Address: Either manually enter the bank name and address or enter the ABA Routing # in the box at the bottom of the page, and then select the Validate button. When you select the Validate button, the system verifies that the ABA Routing # you entered is valid and whether it can be used to populate the bank name and address automatically.
Logo / Text: Select whether you want to display logo or text in this box.
Logo: If you want to display a logo in this area, select the Edit icon, and the Choose Logo To Upload page appears, allowing you to upload your logo for the check. For a logo image to retain its transparent characteristic, it must be exactly 134 X 34 pixels. All signatures that are scanned at 100 dpi should not require any resizing.
Text: If you want to display text on the check instead, select the Text button and you are presented with space to type your text.
ABA Fraction Number
The ABA Fraction Number was used for manual processing before the invention of the MICR code line, but it still serves as a backup in check processing in case the MICR line becomes illegible or torn. It generally appears in the upper right part of a check near the date.
Top ABA #: Enter the information printed on your check stock prior to the slash.
Bottom ABA #: Enter the information printed on your check stock after the slash.
Message 1: You can enter a message to appear on the check (for example, Payroll Check).
Message 2: You can enter a second message to appear on the check (for example, Void After 90 Days).
Next Regular/Manual Check # [Check Number]: Enter the next check number to use when processing payroll. If you want to change this number, select the Change button to see a page where you can update the number.
Signatures
Signature 2: If you want the system to sign your payroll checks when they are processed and to require two signatures, select the Edit icon and a page appears where you can choose the second signature for the check. If no signature is uploaded for Signature 2, the line will not print.
Signature 1: if you want the system to sign your payroll checks when they are processed, select the Edit icon and a page appears where you can choose the first signature for the check.
ABA Routing Number
ABA Routing #: Enter the ABA (American Banking Association) routing number for your bank. The ABA routing number refers to a series of numbers that is required to appear at the bottom of a check. Select the Validate button after entering the ABA number to validate the accuracy of the number. After you select the Validate button, a page appears with the banking information on file with the Federal Reserve. The system verifies the check digit formula of the ABA number to ensure it is a valid number. You can save an ABA number that is not on file or not updated with the Federal Reserve, but you can't save an ABA number with an incorrect check digit.
Account #: Enter the account number assigned to your bank account in this field. If your bank requires special MICR (magnetic ink character recognition) characters in the account number, you can select the Question Mark icon located to the right of the fields to select special characters Special characters are characters that are neither alphabetic nor numeric. These characters may not be allowed in text because they have programmatic uses. Other terms for special characters include reserved characters, restricted characters, forbidden characters, excluded characters, included characters..
When you select the Populate Form button, the information on file will be updated on your check. If you don't want to populate forms, select the Close button.
Preview Pay Statements
On the Bank Account page, you have the option to preview the pay statement by selecting the Preview button at the top of the page. When selected, a Preview pop-up window displays with the following options to preview the pay statement
Stock To Preview: Options include Pay Statement, Pay Statement (Manual), and Vendor Statement.
You may download a PDF version of the pay statement preview from this pop-up window.
Check Settings
The Check Settings section controls what information can be overwritten at the Cost Center (CC) level. When you select any of the options on the right, these check printing items can be overridden at the cost center (CC) level if needed.

Check Numbers
The Check Numbers section is where you can control how check numbers are assigned and for which type of check.

Auto Check Number
Check # From_To: Enter starting check number for this bank account. This is different from the Next Check # field, which is constantly updated as check numbers are used. This field holds the starting check number, which in combination with the Reuse Check Numbers field, controls what happens when checks are rolled back.
Reuse Check Numbers: Select if check numbers can be reused when pay statements are rolled back. The system assigns check numbers upon payroll close. If the payroll is re-opened, the user is given the choice to roll back check numbers. Rolling back check numbers does not reset the Next Check # field. If this option is not checked, there will be gaps of unused check numbers. When this box is checked, the system will go back to the Check # From number and assign any check numbers that are currently not in use.
Manual Checks
Allow Manual Checks: Select if this bank account can be used for Manual Checks (off-cycle or adjustment checks created within the system).
Enable Auto Check Number: Check this box to enable auto-check numbering for Manual Checks, and the following two fields will be visible on the page.
Check # From_To: Enter the range of check numbers to be used in auto check numbering with a From and To range of numbers.
Reuse Check Numbers: Select if check numbers may be reused when pay statements are rolled back.
Hand Written Checks
Allow Hand Written Checks: Select if this bank account can be used for Hand Written Checks (checks created outside of the system but entered to update the system.) When this option is checked, the Reserve Hand Written Check Numbers option appears.
Reserve Hand Written Check Numbers: Indicate the sequence or series of numbers that should be reserved for Hand Written Checks, which are checks created outside of the system but entered to update the system. When this option is checked, the Check # From_To option appears.
Check # From_To: Enter the range of check numbers to be used exclusively for Hand Written Checks with a From and To range of numbers.
Voucher Numbers
The Voucher Numbers section allows you to list a starting number for vouchers.

Voucher # From: This field is editable and allows you to manually define voucher numbers. The field is not required and can be left empty. If the field is left empty, a default scheme is used to define voucher numbers (starting from: 1). If a number is specified, the system will use the user-defined scheme. The count can be increased (for example, from 10 to 100) but cannot be decreased (for example, from 100 to 50). The field cannot be set to 0. If you want to return to the default scheme, create a copy of the existing bank account, and leave the Voucher # From field empty.
Next Voucher #: This field is not editable and will display the next number to be used in the sequence, whether using the default scheme or the user-defined scheme. If the number in the Voucher # From field has not yet been processed, this number will display in the Next Voucher # field until it is processed.
Part of the Following Lists
In the Part Of The Following Lists section, if this bank account check is part of any lists, those lists will be shown here. If you would like to make it into a new list, select the New List button and proceed to create the list.
Select the Preview button to view how the check will look.
Stock to Preview: Select which type of statement you want to preview.
-
Pay Statement
-
Pay Statement (Manual)
-
Vendor Statement
Download PDF: Select this button to send the preview to a PDF file.
Send To: Select this button to send the preview to a list of available printers.
Close: Select this button to close the preview.
Select the Save button.