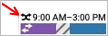
Current time and visual cues
Icons and colors play an important role in helping users quickly identify the state and content of schedules. For example, employee availability is color-coded for quick access:

|
Available — Employee is available to work during this time. |

|
Preferred — Employee prefers to work during this time. Employees indicate when they prefer to work. Preferred availability can be assigned only to employees, not to locations and not globally. |

|
Preferred Time Off — Employee prefers not to work during this time. Employees indicate when they prefer not to work. Preferred Time Off availability can be assigned only to employees, not to locations and not globally. |

|
Unavailable — Employee is not available to work. If employees are scheduled when unavailable, the system can generate a schedule rule Defines restrictions and requirements to ensure that a schedule meets certain criteria. violation. |

|
Unknown — Employee is not certain about their availability. If employees do not know their availability but want to be considered for work, enter their availability as Unknown. |

|
Availability Override Indicator — Availability was created either manually by a manager — such as an Availability Override, a Pay Code edit with an associated Availability, an Enter Time Off with a Pay Code associated with Availability, or an employee's approved Time-off request Request subtypes that employees use to request time off for vacation, illness or recovery, appointments, personal time, or other absences. Time-off requests can be configured to support many different employment scenarios. with a Pay Code associated with Availability — or by an employee's approved Availability Change Request. |
Other visual cues

|
The red squares in the date headers show the current week and current day. ClickTap any day header or a week header to display only that time frame. | |

|
The vertical red line extending from the top to the bottom of the schedule shows the current time on the current day (only available in the Gantt view A type of bar chart that shows a schedule in a calendar view with employees, groups, and jobs; summary totals; and a vertical "today" line.). It moves continuously toward the right. | |

|
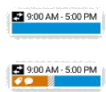
Day cells are shaded to represent the portion of the day that is in a signed-off pay period for each employee. The non-signed-off (open) portion of the day is not shaded. | |
|
Indicates that a schedule item (shift, pay code edit, schedule tag A graphic on the schedule that identifies a specific characteristic that applies to a specific employee on a specific day. Not a shift or a pay code. Example: On call., leave edit, or availability) crosses the day divide Time that defines when one day ends and a new day begins. The day divide is defined in a pay rule. If a shift crosses the day divide, the pay rule defines how the hours are allocated: to the day before, the day after, or to the day on which the worked hour occurred. between a signed-off pay period and a non-signed-off pay period for the employee, and therefore cannot be edited. Displays in the Gantt view, Table view, and in the glance (also known as a contextual callout) Provides information and actions in a dialog box for an item on the screen when the user right-clicks or taps the item. for the schedule item. |
||

|
Indicates the employee is inactive. For multiple assignment employees, indicates that the employee's assignment is inactive or not eligible. Schedule days are gray for multiple assignment employees when:
|
|

|
The Dataview A configurable tool for analyzing data and taking actions on a group of employees or an organization. column controls at the top of the name column allow you to select the columns to show, reorder columns, and to collapse and expand the column display. ClickTap Click Tap Column selection, display order, and sizing settings are saved in your browser cache and are retained when you log out of a session and log back in. They are saved until you explicitly change the settings or until you reset your scheduling personalization settings. |
|

|
The Previous You can clickTap Previous |
|

|
ClickTap a row to highlight the employee name, making shifts, paycodes A category of time or money that employees earn, for example, Regular Hours, Bonus, or Sick., availability, and other information easier to associate with an employee. | |
| Open Shifts |
Identifies the open shift A shift that is scheduled for a job, but no employee is assigned to work it. summary row and displays the total [number] of open shifts in the loaded timeframe. When the loaded timeframe is more than six weeks, the total number of open shifts is not shown. ClickTap Open shifts are sorted alphabetically by the highest common node for each branch of the business structure. Within each node, the shifts are sorted alphabetically by sublocation/subnode down to the jobs, which are also ordered alphabetically. Note: The sort order that is defined in Application Setup > Business Structure Represents the logical structure of an organization as it concerns staffing. It contains the locations and jobs to which an employee may be assigned. Setup > Jobs and Business Structure for jobs is not considered when sorting open shifts. |
|

|
Open shifts (shifts that are not assigned to an employee) appear at the top row of the schedule on the date when they occur. | |

|
The locked icon on a shift indicates the shift is locked and cannot be modified or removed without unlocking it. The icon can also appear on a cell, indicating that no entity can be added, removed or modified in that cell without first unlocking it. Locked cells are gray. | |

|
The comment icon indicates the shift or paycode has a comment attached.Hold the cursor overTap the shift to see the details, including the comment. | |
|
|
The transfer icon indicates that the shift (or a segment of the shift as shown here) is not the primary job, primary labor category, or primary work rule of the employee assigned. | |
|
|
The signed off icon (enlarged here for clarity) indicates that the day is locked by the payroll department and impossible for the scheduling manager to change. No schedule item can be added, deleted, or modified on this day. | |
|
|
Holidays are indicated by a red flag icon (enlarged here for clarity) in the date header. | |

|
Schedule tags appear as a thin colored bar near the bottom of a date cell that identifies additional custom characteristics of a schedule day. The text under the tag shows the name of the tag; hold the cursor overTap the colored bar to see more details. | |

|
Segment tags appear as an icon on a shift or shift segment Parts of shifts that are assigned to a job in the business structure, either primary or transfer jobs.. They identify additional custom characteristics of that shift or segment. Hold the cursor overTap the tag icon to see more details for the tag. | |

|
The people icon flags the shifts of employees who are no longer part of the schedule group Assembles employees who share schedules or any other work characteristics.. For example, if there is a change to the group (or the employees were removed from a group) on a day in the loaded period, this icon indicates that the employees are no longer part of this group. | |
|
The swap shift icon displays on shifts to indicate where shift swaps were made by an employee's approved swap request Employees can exchange their scheduled shift with a shift scheduled for another qualified employee.. | |

|
The dashed border displays on shifts and shift segments to indicate the shift is scheduled for a location other than the locations currently loaded. The dashed border displays in the Schedule Planner and the shift glance. |
|
|
Shifts with bold text indicate that the shift is either a result of an open shift request or a self-schedule request. | |

|
A blue border highlighted around a shift indicates the initial shift you selected to perform a quick action A tool that allows simple schedule edits to be made more easily, particularly when the same action must be taken on several items (Swap, Copy/Paste, or Assign). Information about the selected shift displays in the blue banner at the top of the Schedule Planner. |
|

|
A shift that temporarily displays as grayed out indicates that the system is processing an action (Swap, Copy/Paste, or Assign) on that shift. |
|

|
Shifts with a black border and a red dot displayed in the right corner have been modified but not yet saved in the Schedule Planner. The tooltip and glance for the shift also display a message that there are unsaved changes. When you save the Schedule Planner, the black border and red dot no longer display on the shift. |


Shift and job color coding
Each job can be defined to display as a unique color in the Schedule Planner (Gantt view only). By color-coding each job, you can easily identify job distribution — including transfers and open shifts — at a glance.
Note: The color definitions are made for your organization in the Application Setup component. If your organization does not define colors for specific jobs, the default colors display: purple for regular job and blue for transfers.
When a shift is assigned, the job displays as the defined solid job color. For open shifts, the job displays as an open box with the border in the job color. After you assign an open shift, the job color becomes solid. For multiple segments, each segment displays the applicable color.
| Primary Job Definition | Regular Shift | Open Shift | Transfer |
|---|---|---|---|
|

|

|
|
Specific cues are as follows:
|
|
The color of the employee's primary job is displayed in the line below the employee's name. | |

|
Assigned shifts and shift segments are displayed in the defined color of the job. | |

|
Breaks have gray, diagonal stripes. | |
|
|
Transferred shifts and shift segments display in the defined job color. | |

|
Paycodes are green. | |
|
|
Open shifts are displayed as an open box with the border in the job color | |

|
Locked cells are shaded gray and display a Locked |
Rule violation indicators
The following icons display in the Severity column of the Rule Violation add-on to indicate the highest rule violation affecting an employee. An asterisk (*) beside the icon means that there are multiple rule violations affecting the employee's schedule.
|
|
Informational — A rule has been broken, but at the lowest level of severity. |
|
|
|
Warning — You can save the schedule and continue without responding |
|
|
|
No Save — The schedule cannot be saved with this severity of rule violation. |