Some entities are assigned to an attribute. This enables you to create a report that uses the same entity for multiple columns with each column using a different assignment. For example, you can assign three different phone numbers to an employee (Phone 1, Phone 2, and Phone 3) in People Information. To create a table that contains three columns, each of which lists a different phone number, you would use the Employee Details -Phone Number entity for each column and apply different assignments.
Here's how you do it:
- From the Report Data Object Management page, click Add
- On the New Report Data Objects page, enter the Report data object key and enter the description of the data object in the Description field.
-
Select or clear the Column Relationship Rules check box. By enabling this check box, you can only create RDOs with entities that have defined relationships in the system. If needed, you can clear the check box so you can create RDOs that may render data in different rows for the selected grain in the RDO.
-
Note: The Column Relationship Rules option is only available when enabled and allowed. See Ability to Disable Column Relationship Rules.
- To use the same entity with different assignments:
- In the Columns area, click Add
. - In the Select Column glance (also known as a contextual callout) Provides information and actions in a dialog box for an item on the screen when the user right-clicks or taps the item., select an entity. In the phone number example, select the Employee Details entity with the Phone Number column.
- In the Add Column Properties glance, edit the label and assignment, then click Add Column. For example, change the label to Home Phone and the assignment to Phone 1.
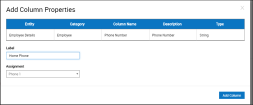
- Repeat steps b and c, selecting the same entity and changing the label and assignment for each column. For example, change the label to Cell Phone and the assignment to Phone 2 and then repeat the process, changing the label to Work Phone and assignment to Phone 3.
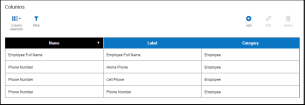
- When finished, click Save. The report in the example will have and an Employee Full Name column and three columns for phone numbers: Home Phone, Cell Phone, and Work Phone.
- In the Columns area, click Add
- From Common Setup, select Unpublished Reports or Published Reports.
- Select Create
. from Unpublished Reports or Create Design - If no report data objects are listed:
- Click the layout pane (the block labeled Select and drag item to insert the available data).
- In the Select Data glance, select the applicable report data objects from the Available Data box and move them to the Selected Data box. When finished, click OK. The selected data object are now listed in the Data column on the left side of the screen.
- To review the possible columns, expand the applicable report data object and then expand the corresponding BaseDataSet.
- Select Insert > Table > Table to open Table Builder. Table Builder contains two tabs: Data and Filter.
- From the Data tab:
- Expand the Use Data From drop-down list and select the desired report data object. You can only select one report data object.
- Expand the report data object to display the possible columns.
- Hold down the Ctrl key and select the columns to include in the table and then click the right arrow to move them to the Current Column Selections box. You can change the order of the columns by using the up and down arrows.
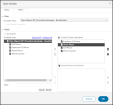
- If necessary, click Add Filter, select the data object in the Filter By drop-down list, add a condition and value, and click OK.
- Click OK in Table Builder.
- When finished defining the columns, select Save and View
 .
. - Give the report a name in the File Name field and click OK.
- In the Parameters glance, select the applicable information:
-
 Time Frame
- Start Date — Enter the time frame start date.
- End Date — Enter the time frame end date.
-
 Hyperfind Selector
- Hyperfind A search engine that filters and selects groups of employees through queries that specify conditions or locations (criteria). — Enter one of the Hyperfinds
- People Ids — Leave this blank.
- Location Ids — Leave this blank.
- Organization Ids — Leave this blank.
- Show Chart — Select Yes or No to show a chart.
 Parameter type
- The parameter type is listed at the bottom of the Parameters glance. Note that only one is listed even if you defined more than one. By default, the system combines the same entities with multiple assignments.
- To display each column separately, select No Value as the parameter value. When you select No Value, individual values will display in the report columns. If you do not select No Value and have a single value selected, all the columns are rendered based on that value. Click OK when finished.
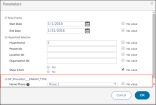
A preview of the table report opens. You can return to the report design and modify it as needed,
- When finished designing the report, select File > Save as and give the file a name and description in the Save As glance, then click OK. The report is now listed in Unpublished Reports
When you publish the report, you can hide this parameter and make it non-mandatory.
- From the Unpublished Report page, select the report and click Publish
. The New Published Report page opens. - Enter the report name, description, label, default output type, and category.
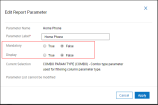
- In the Report Parameters area, select the parameter that you edited in step 3, for example, Home Phone and, in the Edit Report Parameter glance, change Mandatory and Display to False and click Apply.
