Add a shift
Note: You cannot add shifts on signed-off or locked days.
Create a shift by typing (table view only)
Click Tap a cell in the schedule and enter one of the following:
- The name of a shift template A shift that has a name and defined segments and attributes, but no date or assigned employee.. For example, if your site has a shift template called day12, click the cell and type "day12".
- A start time and an end time separated by a hyphen. Use standard time-of-day format Use 12-hour or 24- hour format. You can omit the colon or use decimals. Examples: For 5:00 AM, enter 5 or 5a. For 5:15 PM, enter 515p, 1715, or 5.25p.. For example, click the cell and type "8a-4p" to create a shift from 8:00 in the morning to 4:00 in the afternoon.
Create a shift from a template
- Right-clickTap a date cell in the schedule. The Employee glance (also known as a contextual call-out) Provides information and actions in a dialogue box for an item on the screen when the user right-clicks or taps the item. appears.
- ClickTap Insert Shift Template
>. The Insert Shift Template panel opens. - Select the shift template from the list. You can also use the Search box to locate the appropriate shift template.
- Click Save
Note: A shift created from a template is not linked to the template. If you modify the template, existing shifts do not change. Only shifts created after the template modification are affected. Similarly, if you modify a shift created from a template, the template is not affected.
Create a shift with all options available
Right-clickTap a date cell in the schedule, then click tap Add Shift
Select More
- Use Template sets the shift parameters to match the shift template that you select.
- Change Shift Label modifies the label displayed on the schedule when Shift Label visibility is selected. Shift labels do not change automatically if you edit a shift.
When you select an on-call work rule, all segments on the shift must have an on-call work rule specified with the same call-in rule.
Example: If the shift label is 7a3p, and a manager modifies the end time to 4:00pm, the label does not change and it no longer accurately reflects the end time of the shift. Best practice is to change the shift label if you modify the shift, in this case to 7a4p
Use the shift panel graphic to adjust the start and end times of any segment of the shift.
-
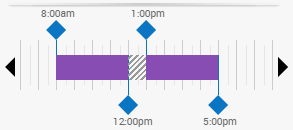
- Drag the blue diamond left or right to adjust the start or end time of a segment.
- If the start or end time you need is not visible (because it is beyond the left or right edge of the panel) select the left caret
or right caret to bring the desired time into view. - Drag the break
 left or right to reposition it without changing its duration.
When you create, modify or move shifts, the system automatically adjusts the break within the shift to comply with the adjusted shift length or work rule transfer. Breaks are added or adjusted based on Automated Break Placement rules that are configured in employees' default work rules, such as required break length, time without a break, and coverage.
Automatic break adjustments apply to shifts created or modified in the Schedule and in the Shift Editor. The shift is visually updated in the Schedule to show the modified breaks.
In the Schedule, breaks are automatically added or adjusted when you:
- Resize a shift by dragging the start time or end time.
- Drag and drop a shift to a different employee.
- Drag and drop a shift to a different day.
- Right-click on a shift and select Assign Breaks in the glance.
In the Shift Editor, breaks are automatically added or adjusted when you:
- Select Assign Breaks when creating or modifying a shift. A break is automatically added in the shift based on configured Automated Break Placement rules when you click Apply.
Assign Breaks may break one or more shift segments Parts of shifts that are assigned to a job in the business structure, either primary or transfer jobs. in two.
Moving or resizing breaks directly in the Schedule Planner overrides the Automated Break Placement rules that are applied when Assign Breaks is selected in the Shift Editor.
- Click Add Segment.
- In the Add Segment editor, select the displayed segment type – for example, select Regular
– if you want to choose a different segment type to add. - Regular is the primary location and job of the employee, which also references (as applicable) the employee's primary work rule, payer cost centre and labour category.
- Transfer is the business structure (location and job), work rule, payer cost centre or labour category that you define for this segment, for this employee. The Transfer a shift panel appears.
- Break is a default break.
- Enter the Start Time and End Time for the segment.
- Click Add. The shift graphical view and the shift details are updated to include the added segment.
- Click Tap
to see more options for modifying the segment: - Delete Segment removes this segment from the shift.
- Add Segment Tag A graphic applied to a shift segment to indicate that the shift segment has a specific pre-defined characteristic. Example: "Trainee" attaches a tag to the segment to identify defined characteristics. The Add Segment Tag panel appears.
-
- ClickTap the tick box for the tag or tags that you want to add. To find a specific tag in a list of many, enter the first few letters of the tag name in the search field and press Enter.
- ClickTap Apply.
- Add Skills and Certifications enables you to specify specific qualifications for a shift segment. The Skills and Certifications panel appears.
-
Note: You cannot add skills and certifications to a break.
- Transfer Employee is an alternative method to define the segment as a transfer. The Transfer a shift panel appears.
- Click Apply.
Add Comment allows you to attach a predefined comment to the shift by selecting it from a menu.
- To add a personal note to the comment, type in the box.
- To delete a comment or a note, select the
next to it. - Shifts with comments attached appear like this on the schedule:
-
